How I run my blog on a Raspberry Pi

Image by: Dwight Sipler on Flickr
I set up a Raspberry Pi as a web server to host my personal blog on Drupal.
Like many folks who enjoy tinkering with technology, I now have a small but growing collection of Raspberry Pi boxes around my house. I’ve used them for various projects: A PiHole network ad blocker, an OctoPi 3D print server, and a Minecraft server, among others.
However, the most custom project I’ve done is setting up a Raspberry Pi to act as a web server to host my own blog site, mandclu.com. I got the idea while researching for an interview I did a couple of years ago.
The project has evolved significantly since it started, so I thought it would be interesting to share.
Why run my own web server?
I started building websites a little over two decades ago. I used various hosting solutions at that time, including a (nearly) bare-metal Linode instance where I had to install and configure all the software myself.
I recently had a small account at a major hosting company that I used to serve a couple of personal projects. Over time, I’ve found that I’m less interested in using my time for freelance projects, so the cost was getting harder to justify. Because of the security measures built into their hosting platform, I also felt frustrated being limited by what tools I could use and how I could use them.
In short, I wanted to run my own server because it would be free, in the sense of free speech, free beer, and, as I would soon learn, free puppies.
Would I recommend that everyone host their own website? Absolutely not. It’s been a fun project, and I’ve learned a ton along the way, but if my website was down for a few hours (or potentially longer) because of local power or network outage, I could live with that.
In a previous article, I discussed why I chose Drupal for my site. While I think it’s a powerful and infinitely flexible solution, the steps below largely apply to any PHP-based CMS or development framework you might want to host.
A Raspberry Pi web server: The maiden voyage
I bought a Raspberry Pi 4 with 4Gb of RAM for the project. I had seen some documentation that the quality of the MicroSD card you use with a Pi makes a significant difference for performance, so I also tried to source a decent card. All told, I was probably getting close to US$ 100, including a case and power adapter.
The first decision was what OS to use. CentOS seemed like the best choice for something exposed to the internet, so I decided to go with that. As it turns out, CentOS had some marked differences from any other flavor of Linux I’ve used, especially because it wanted to reset the permissions of all the server logs on every reboot. I eventually figured out how to handle that gracefully, but it added to the adventure.
Next, it was time to get the Pi set up to act as a web server. I know some super-smart DevOps folks who prefer to use Nginx as a web server for their projects, but I’m personally a lot more familiar with Apache. Also, Drupal implements some security controls using .htaccess files, so if going with Nginx, you would need to manage equivalent restrictions in the server configuration. But the truth is that more than anything else, I wanted to go with the devil I knew.
Fortunately, a quick search can bring up a variety of tutorials on how to install the remaining parts of a LAMP stack on CentOS (or your preferred flavor of Linux). Even better, modern package managers like Yum make the process relatively painless. Drupal also has a few PHP requirements of its own, so there was an extra step to make sure I met those. Finally, I like to use APCu as a PHP-native data cache to help speed up the delivery of PHP sites, so I made sure that it got installed and the PHP extension enabled.
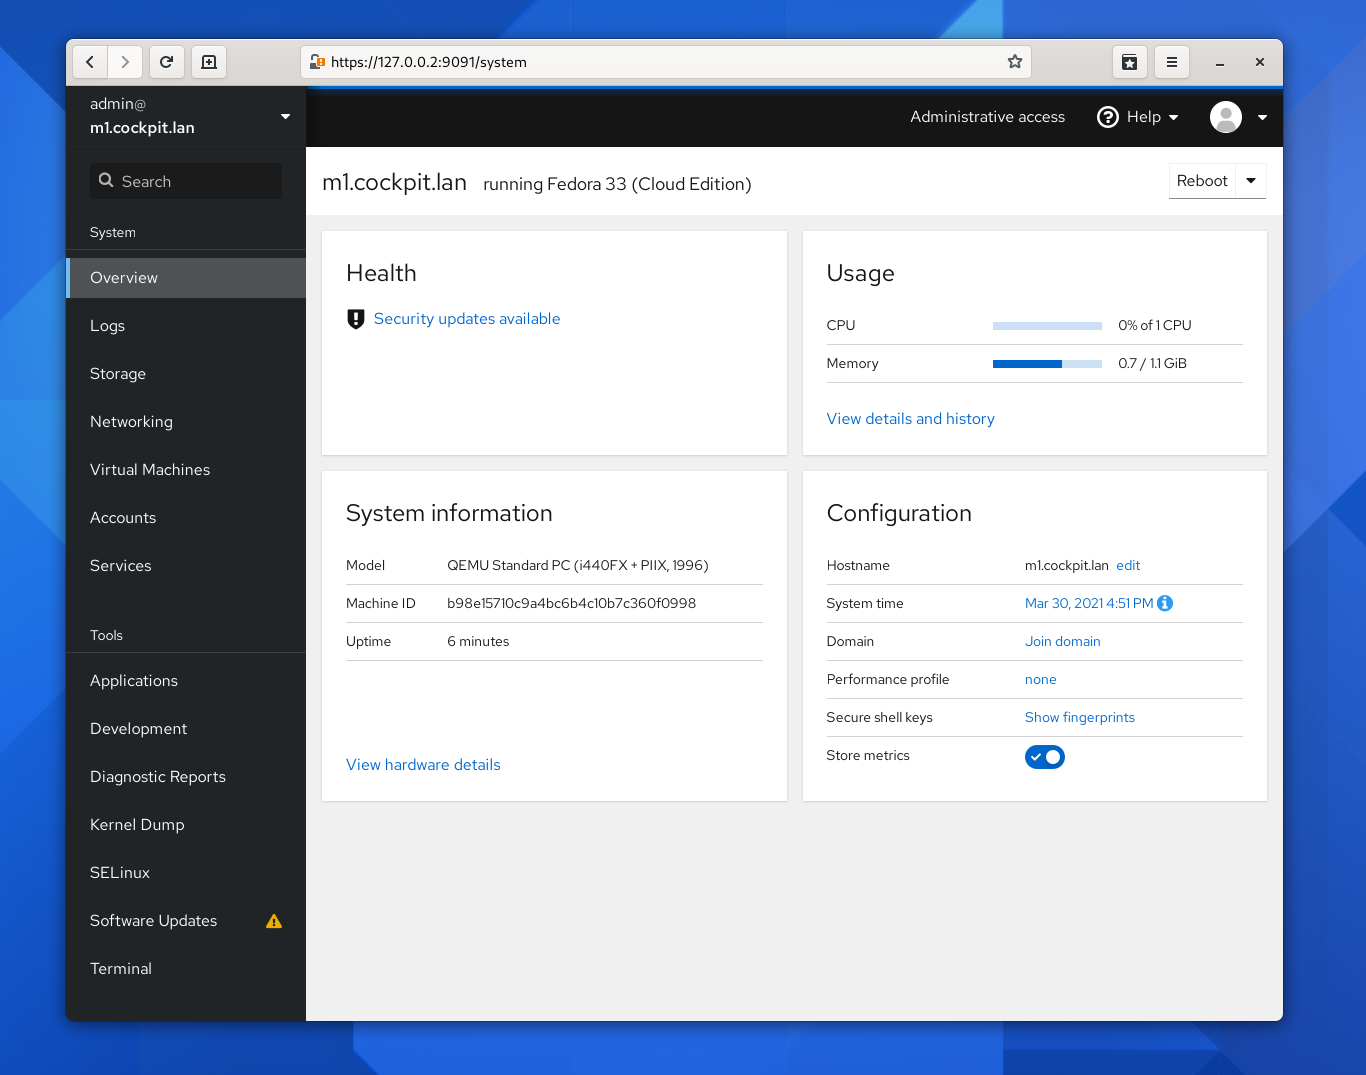
While searching for answers for the miscellaneous hiccups, I came across an interesting add-on that made managing the Pi as a web server much easier: Cockpit. It provides an easy-to-use graphical interface to see the status of the machine and all its software: How it’s running (or if it isn’t). You can see when updates are available and run them, access logs, and more. It even includes its own command-line interface, so you can completely manage pretty much everything from the one interface.
Installing Drupal on Raspberry Pi
Getting Drupal itself installed is pretty straightforward if you know the intended process. If you haven’t already, install the Composer PHP dependency manager. Then you can install Drupal in a couple of steps:
composer create-project drupal/recommended-project my_site_name_dirConfigure your web server to use the web directory within that install location (my_site_name_dir in the example above) as the document root for a virtual host (or a server block in Nginx).
If you try to access the virtual host, Drupal triggers the rest of the installation process for you.

I decided to create the site on my laptop, then push the site code to a Git repo on GitLab, and pull it down to the server from there, but that isn’t strictly necessary if you’re just looking to try out Drupal on your Pi.
Getting the word out (of the network)
I now had my Raspberry Pi working as a web server and my Drupal site running well on top of it. Great! But no one outside my network could access it.
I went into my router’s web UI and used port forwarding to make sure incoming web requests (ports 80 and 443) would get directed to the Pi. I did that in a couple of minutes. But how would people find the site?
I bought a domain name, and my registrar had its own utility for dynamic DNS, which is great because a drawback of using your home’s internet connection is that home users typically don’t have a static IP. After installing their utility and waiting for the DNS setup to resolve, users could reach my new website at mandclu.com.
Of course, the site also needed to allow for secure connections, so I also needed to add an SSL certificate. It used to be that this meant purchasing a certificate that would have cost more than the Pi itself and paying that again every year on renewal. Fortunately, Let’s Encrypt achieves a similar result for free. You can even install the certbot to renew the certificate automatically.
My own Raspberry Pi web server
I was really happy with the result. Was it as fast as expensive, enterprise-grade hosting? Nope. But I could host my own site for free (or, more accurately, for the cost of the electricity to power the Pi), and I had complete freedom to configure the server any way I wanted.
It did seem like the site started to show occasional slowdowns over time, but it was fast enough for the meager traffic I was getting (almost none), so it met my needs.
I enjoyed playing with the site styling and posting content when I felt inspired to write it. And then, the move came.
I moved homes at the end of 2020 (the last day of the year). One of the downsides of having your website hosted from a Pi box in your living room is that moving house means your website goes down for a while. In my case, a few weeks since having my pet project website back online wasn’t a major priority.
Eventually, I got my web server Pi hooked up and plugged in again and was ready to add some new content. I was surprised to find that the site was running noticeably slower than I remembered. A great thing about being a web developer is that you make friends with lots of smart people, so I reached out to a friend who mentioned that MicroSD cards sometimes slow down over time under regular use.
Speeding up my web server
I decided it was time to rebuild the server, so I made several changes. For starters, I had since bought an 8GB Pi 4 to use as a Minecrafter server, but then my son’s interest in the game had fallen off, so I decided to use that hardware for the new version. Instead of a MicroSD for storage, I bought a low-capacity NVMe SSD and a USB 3 enclosure. Those two elements probably cost as much as I had previously spent on the Pi, MicroSD card, power supply, and case, but the server is still running really well nearly a year later.

Instead of just copying over everything I had previously installed, I decided to reinstall the software. Moving to the 8GB Pi 4 meant I needed a 64-bit OS, which meant that Ubuntu server was my best option. There are more options today, but I’ve been thrilled with Ubuntu, despite a new learning curve. Some directories are in different places. I had to get used to Apt instead of Yum for installing new packages, and so on. But the overall process was really the same, with a few minor differences in the steps themselves.
Another significant change I decided to make during the rebuild was to add Cloudflare as a content delivery network (CDN) to speed up the delivery of the site. In its most basic form, a CDN speeds up a website’s delivery by keeping cached versions of the site’s files at various local points of presence (PoP) distributed worldwide. Fortunately, Cloudflare has a free plan, so I decided to put that in front of my Pi-hosted website.
The result
The upgraded version of the Pi web server clocks in fast. Like, really fast:
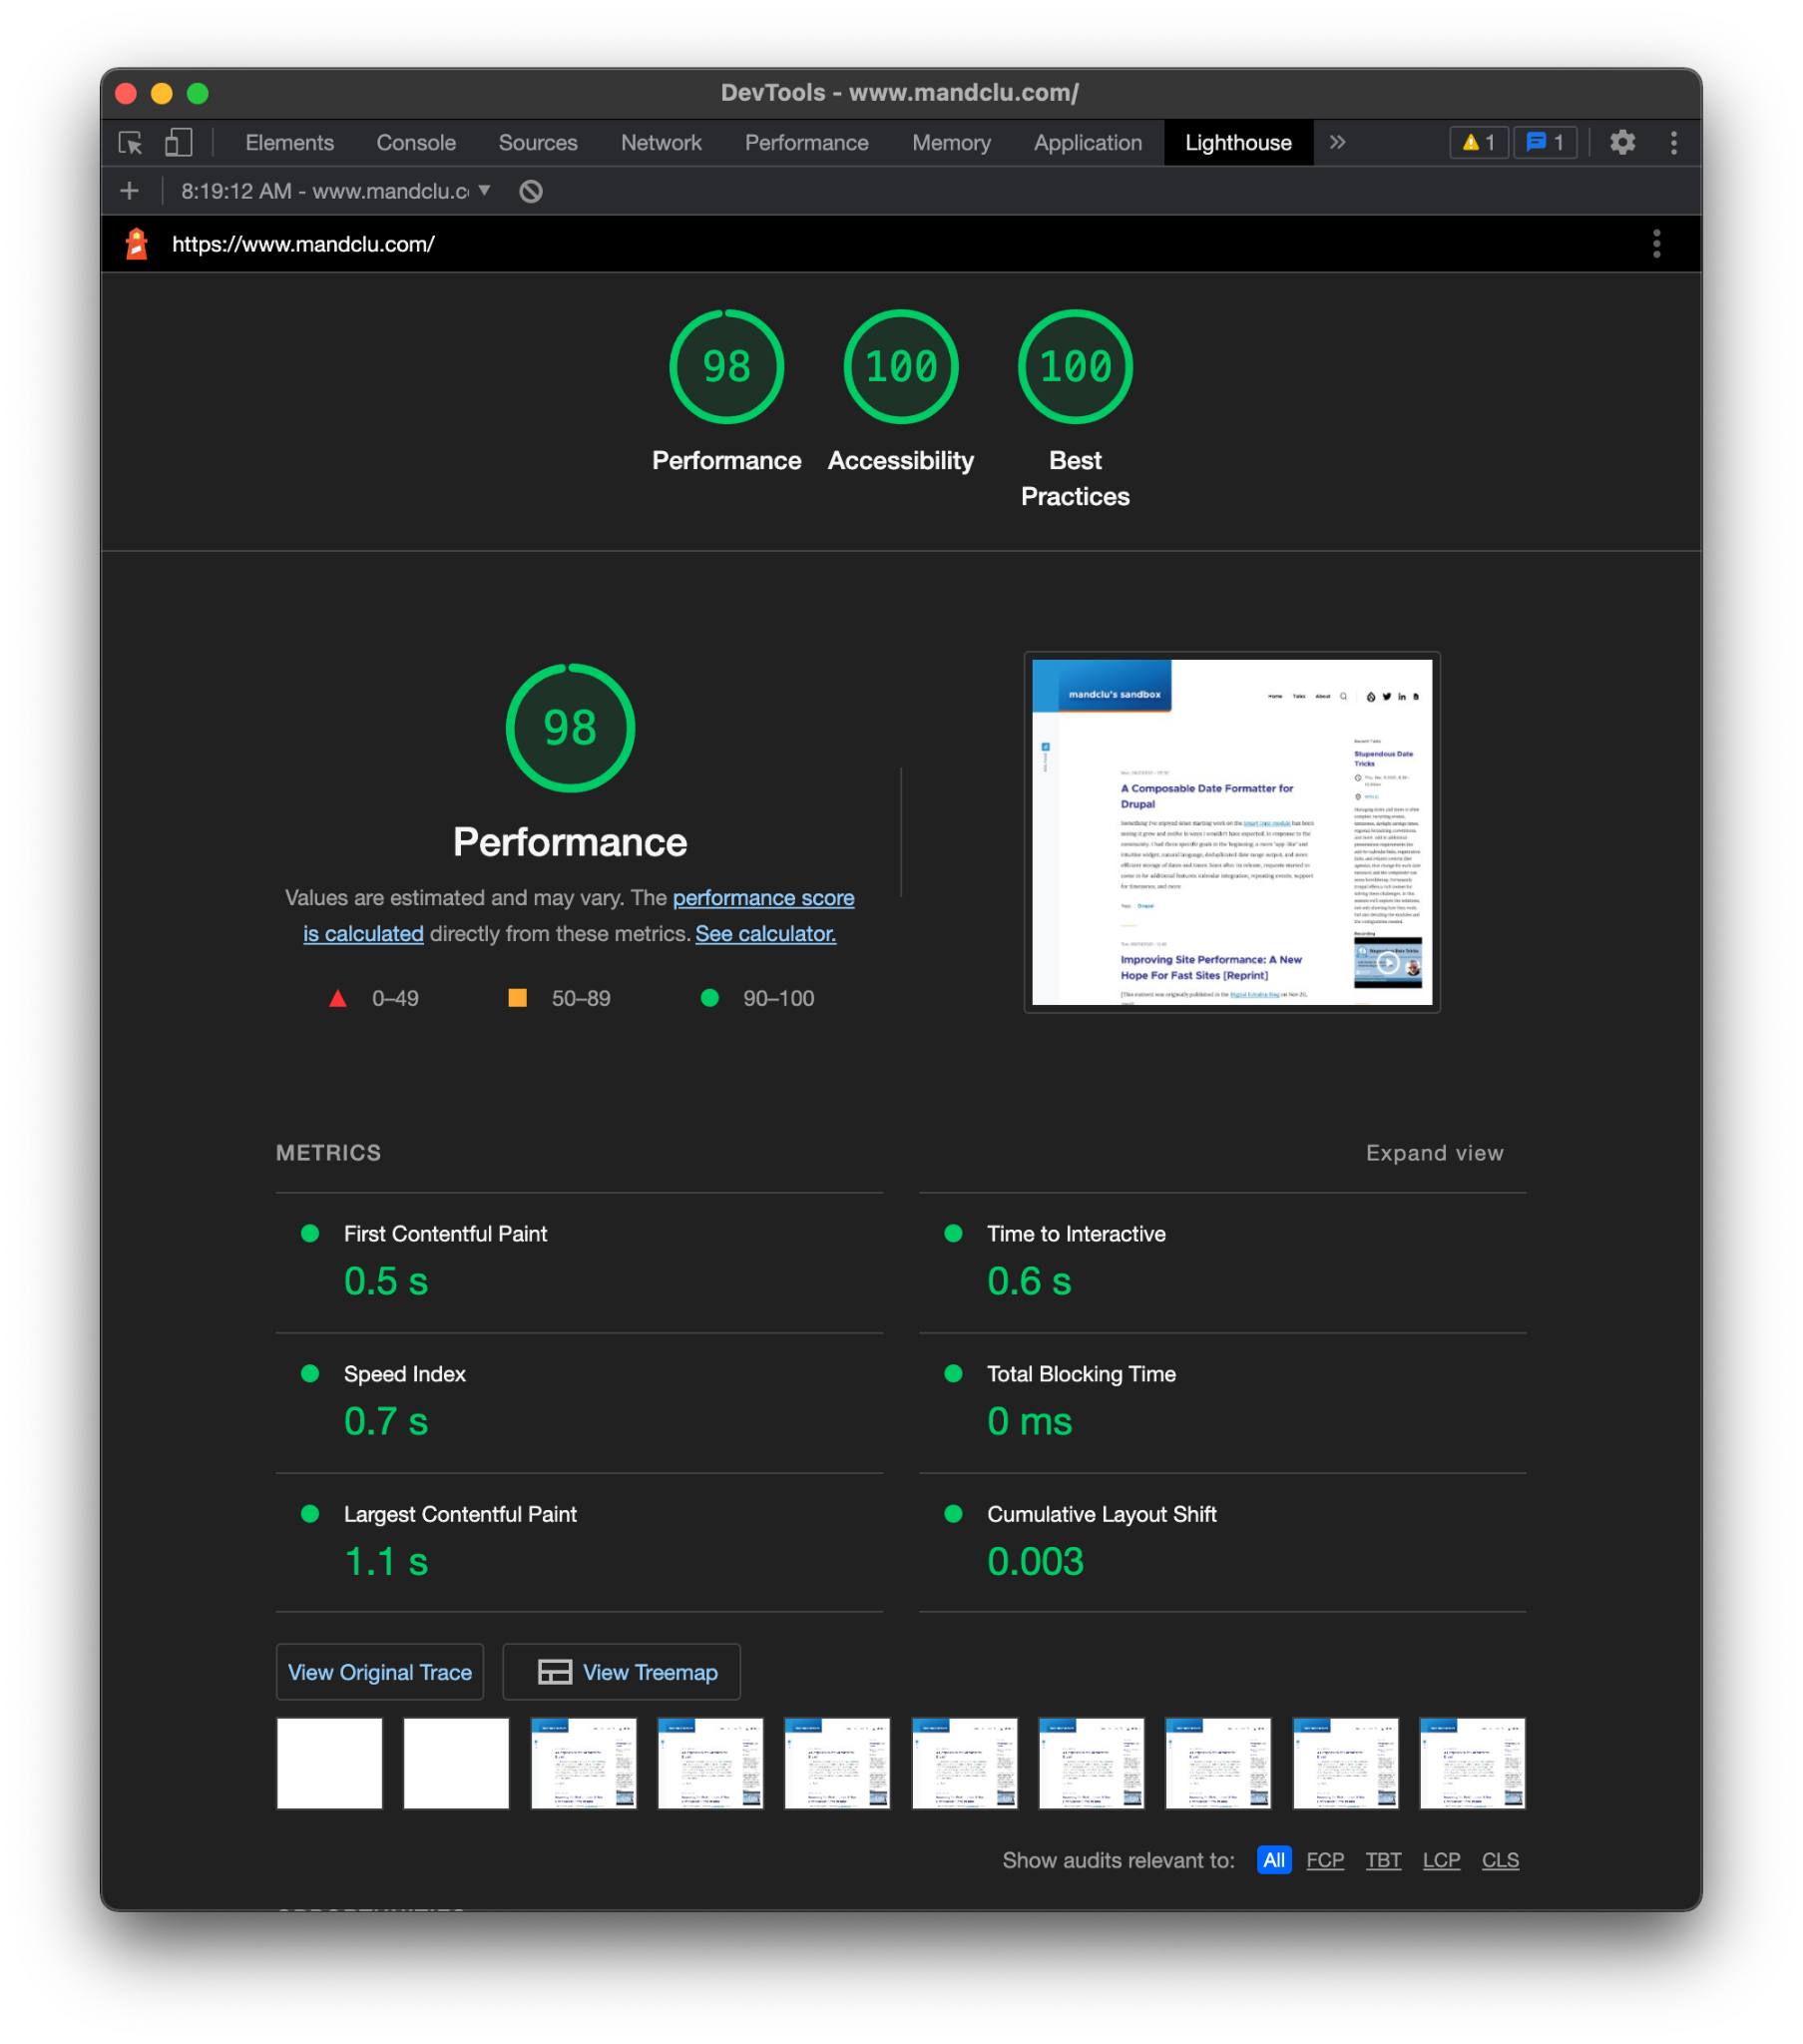
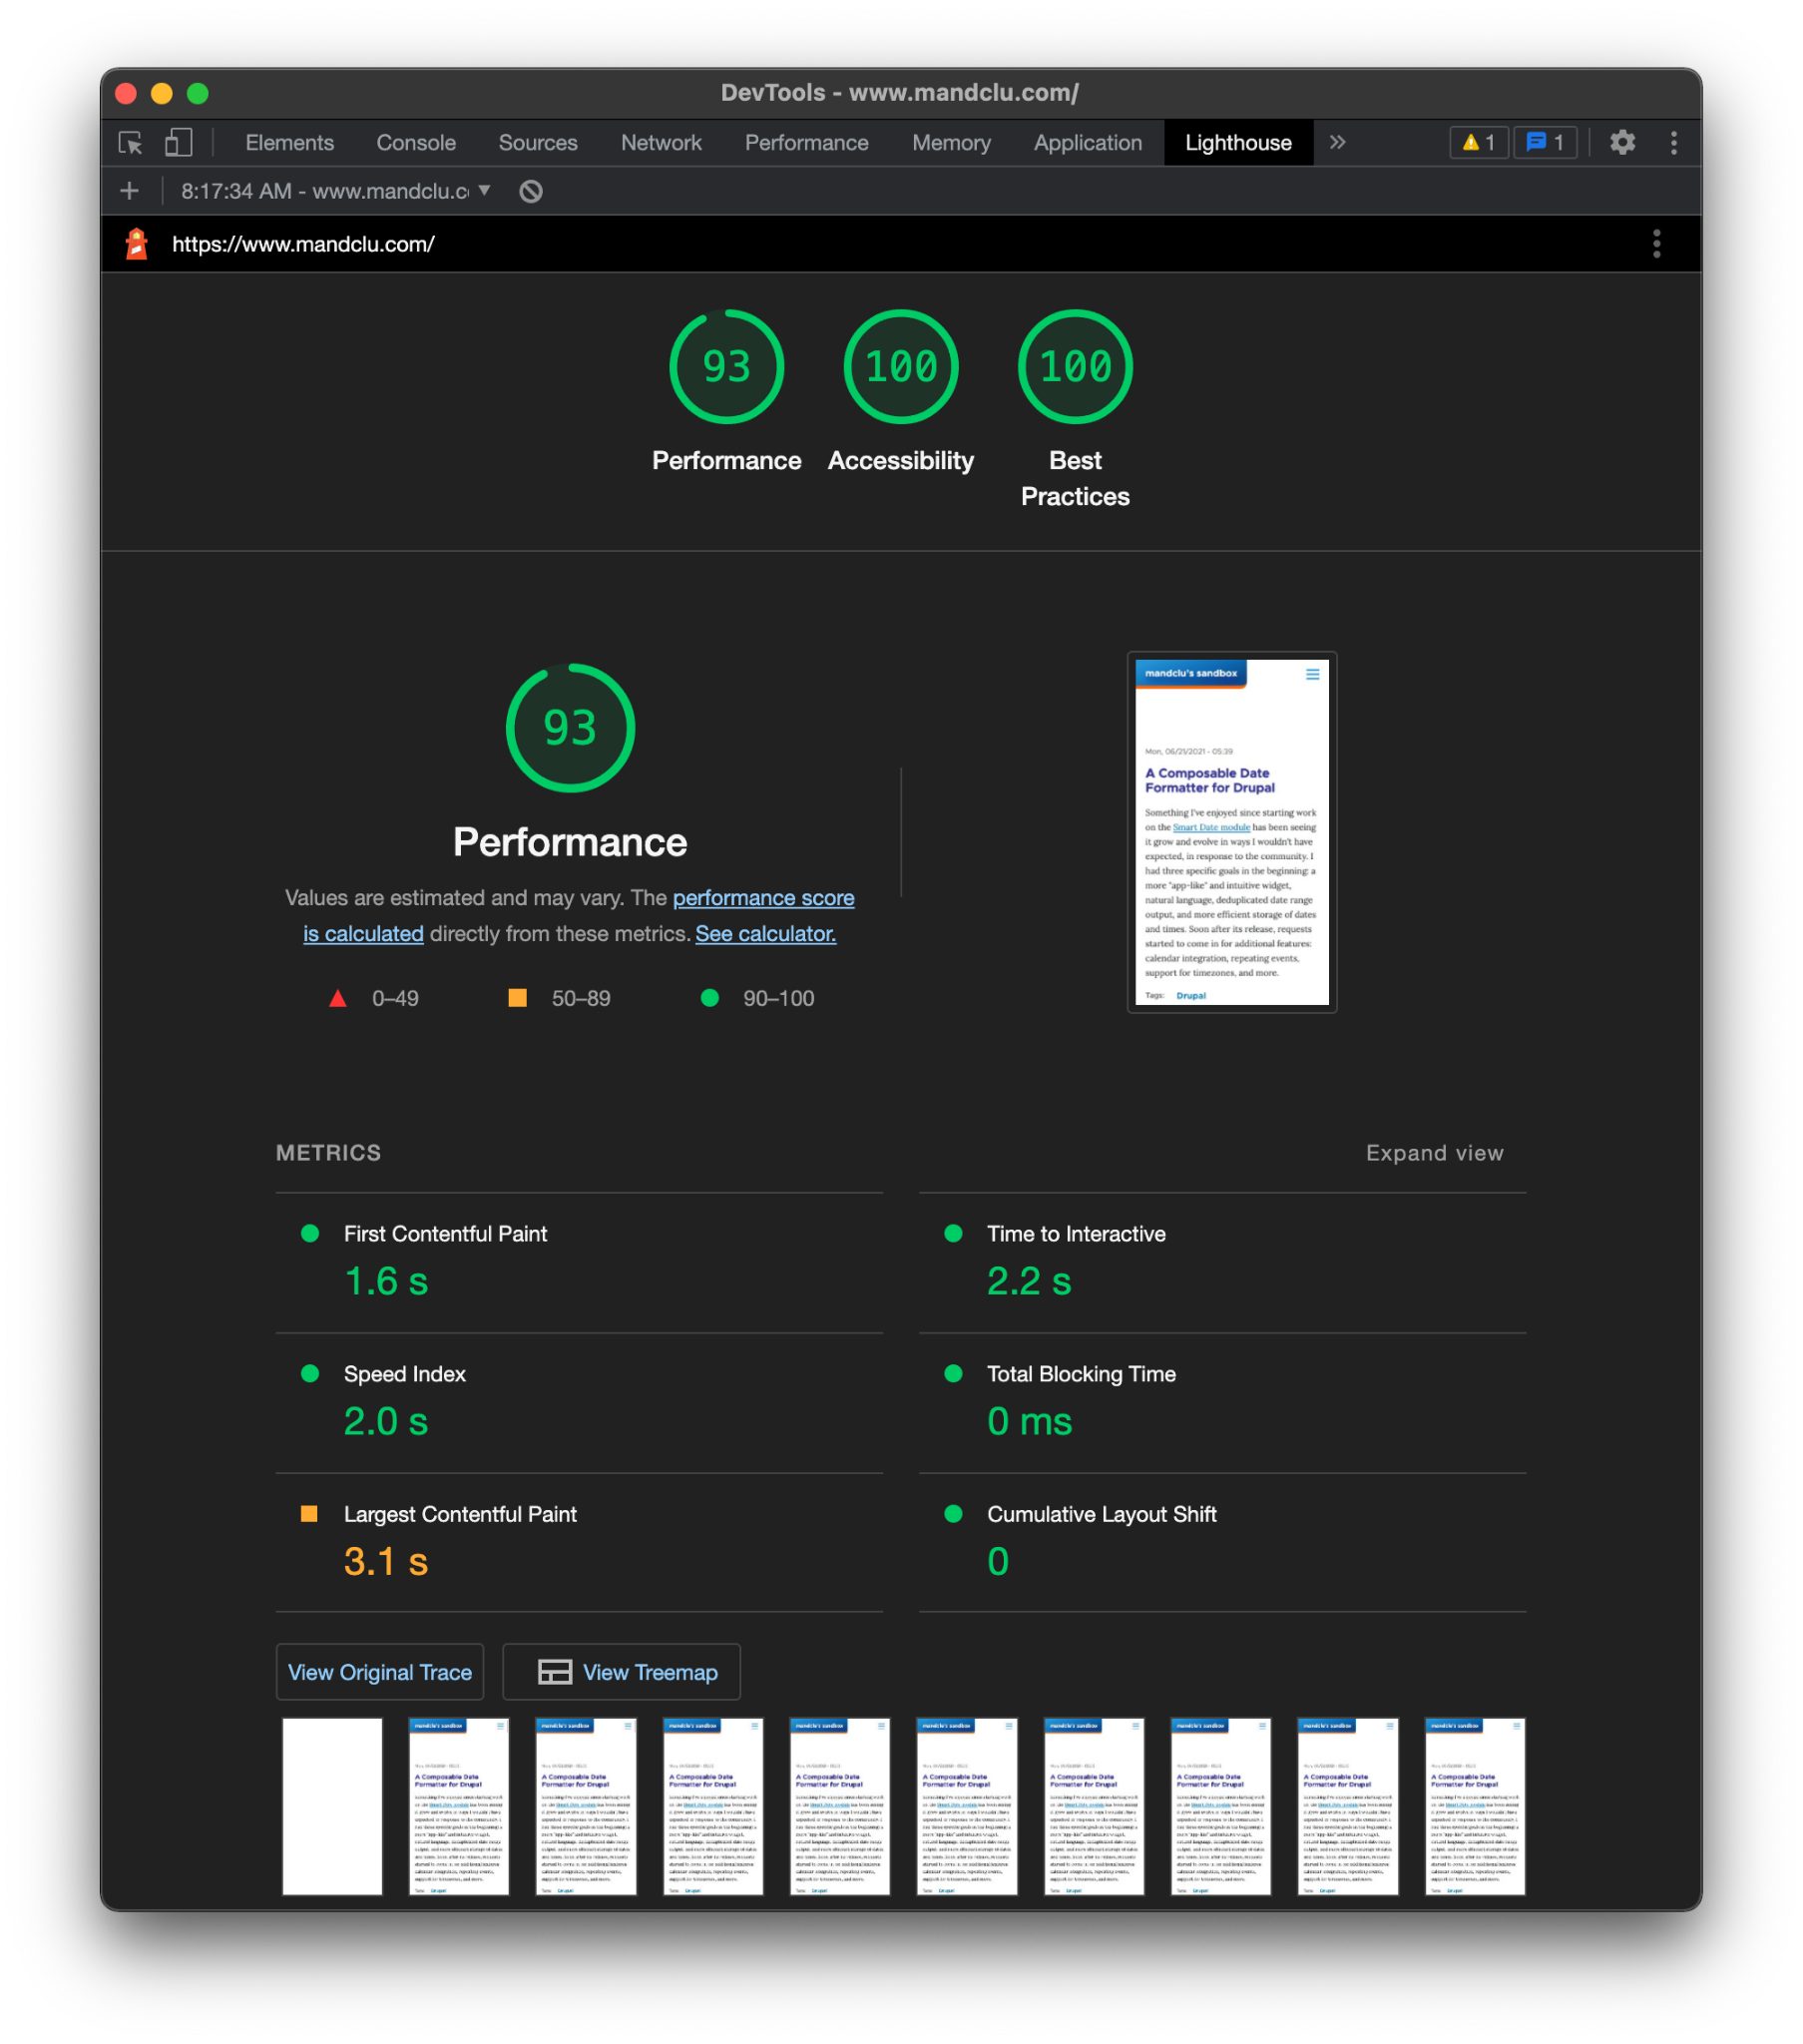
I’ve run speed tests on many websites (admittedly, most of them were Drupal), and these are some of the best scores I’ve seen. It does help that the site is simple by design. If more images were on the site, it would probably score slightly lower, especially for mobile (where the Lighthouse test throttles bandwidth to simulate a slow 4G connection).
It’s worth pointing out the accessibility scores as well—with no effort on my part. Another advantage of running my site on Drupal is building on top of a framework already rigorously tested to be easily used on screen readers and other assistive technologies.
The only work I had to do to hit the best practices score was installing and configuring the free Security Kit module.
Build your own Raspberry Pi server
If you’ve wanted to try Drupal for a personal web project, and especially if you happen to have an extra Raspberry Pi gathering dust, then I hope you’ll try setting up your own server.