Last Updated on January 20, 2026 by David Both
I mentioned in Episode 1, that I was going to start my conversion of at least a few of my physical systems to BtrFS by testing on a VM, but I decided there’s not really any point to that. A simple VM with no real work to do is a crap test. Besides, I do have a system sitting there, doing almost nothing. Well, except for serving our family pictures to the other systems on my network. That’s another story, but it’s part of my long-term testing strategy.
The system I chose is bunkerhill and it has a decent set of specs as you can see in Figure 1. With an Intel i9, 8 core and 16 CPUs at nearly 5GHz, and 32GB of RAM. It’s a fast system with lots of resources.
#######################################################################
# MOTD for Tue Nov 18 05:24:03 PM EST 2025
# HOST NAME:            bunkerhill.both.org
# Machine Type:         physical machine.
# Host architecture:    X86_64
#----------------------------------------------------------------------
# System Serial No.:    Default string
# System UUID:          3b702977-a782-a01e-a08f-2cf05d26c209
# Motherboard Mfr:      Micro-Star International Co., Ltd.
# Motherboard Model:    Z390-A PRO (MS-7B98)
# Motherboard Serial:   K316882609
# BIOS Release Date:    12/25/2019
#----------------------------------------------------------------------
# CPU Model:            Intel(R) Core(TM) i9-9900K CPU @ 3.60GHz
# CPU Data:             1 Eight Core package with 16 CPUs
# CPU Architecture:     x86_64
# HyperThreading:       Yes
# Max CPU MHz:          5000.0000
# Current CPU MHz:      4699.956
# Min CPU MHz:          800.0000
#----------------------------------------------------------------------
# RAM:                  31.209 GB
# SWAP:                 7.999 GB
#----------------------------------------------------------------------
# Install Date:         Wed 22 Oct 2025 11:50:12 PM EDT
# Linux Distribution:   Fedora 43 (Forty Three) X86_64
# Kernel Version:       6.17.7-300.fc43.x86_64
#----------------------------------------------------------------------
# Disk Partition Info
# Filesystem      Size  Used Avail Use% Mounted on
# /dev/nvme0n1p3  475G   10G  464G   3% /
# /dev/nvme0n1p3  475G   10G  464G   3% /home
# /dev/nvme0n1p2  2.0G  450M  1.4G  25% /boot
#----------------------------------------------------------------------
# LVM Physical Volume Info
# PV            VG              Fmt     Attr    PSize   PFree
# /dev/sda      vg02    lvm2    a--     <465.76g        56.00m
#######################################################################
# Note: This MOTD file gets updated automatically every day.
#       Changes to this file will be automatically overwritten!
#######################################################################
Figure 1: My BtrFS test system has an excellent set of specs for this project.
This system also has a hard drive that I use for storing and serving my family pictures. It will make a good test bed.
The current test
I recently found a new way to stress-test my Linux hosts and this is a perfect example of how the stress command can be used. I wanted to make this test realistic while concentrating on I/O and the storage device, in this case, a 500GB NVMe device. In addition to the I/O test, I’m also stressing the CPUs to about 67%.
I used the command in Figure 2 to launch stress. The -c option specifies 10 CPU worker threads, -i spawns 8 I/O threads which simply flush the buffers to disk, and -d launches 15 disk worker threads to maintain a high level of activity. Overall disk I/O is running at about 95 percent.
# stress -c 10 -i 8 -d 15 -vFigure 2: The command I used for stress testing BtrFS on my system.
The -v (verbose) option causes stress to display the status messages seen in the right pane of the Konsole window in Figure 3. The left pane in Figure 3 is the system monitor btop, which I like because it shows a graphical representation of the system resource usage over time. This gives an excellent picture of recent events in the system.
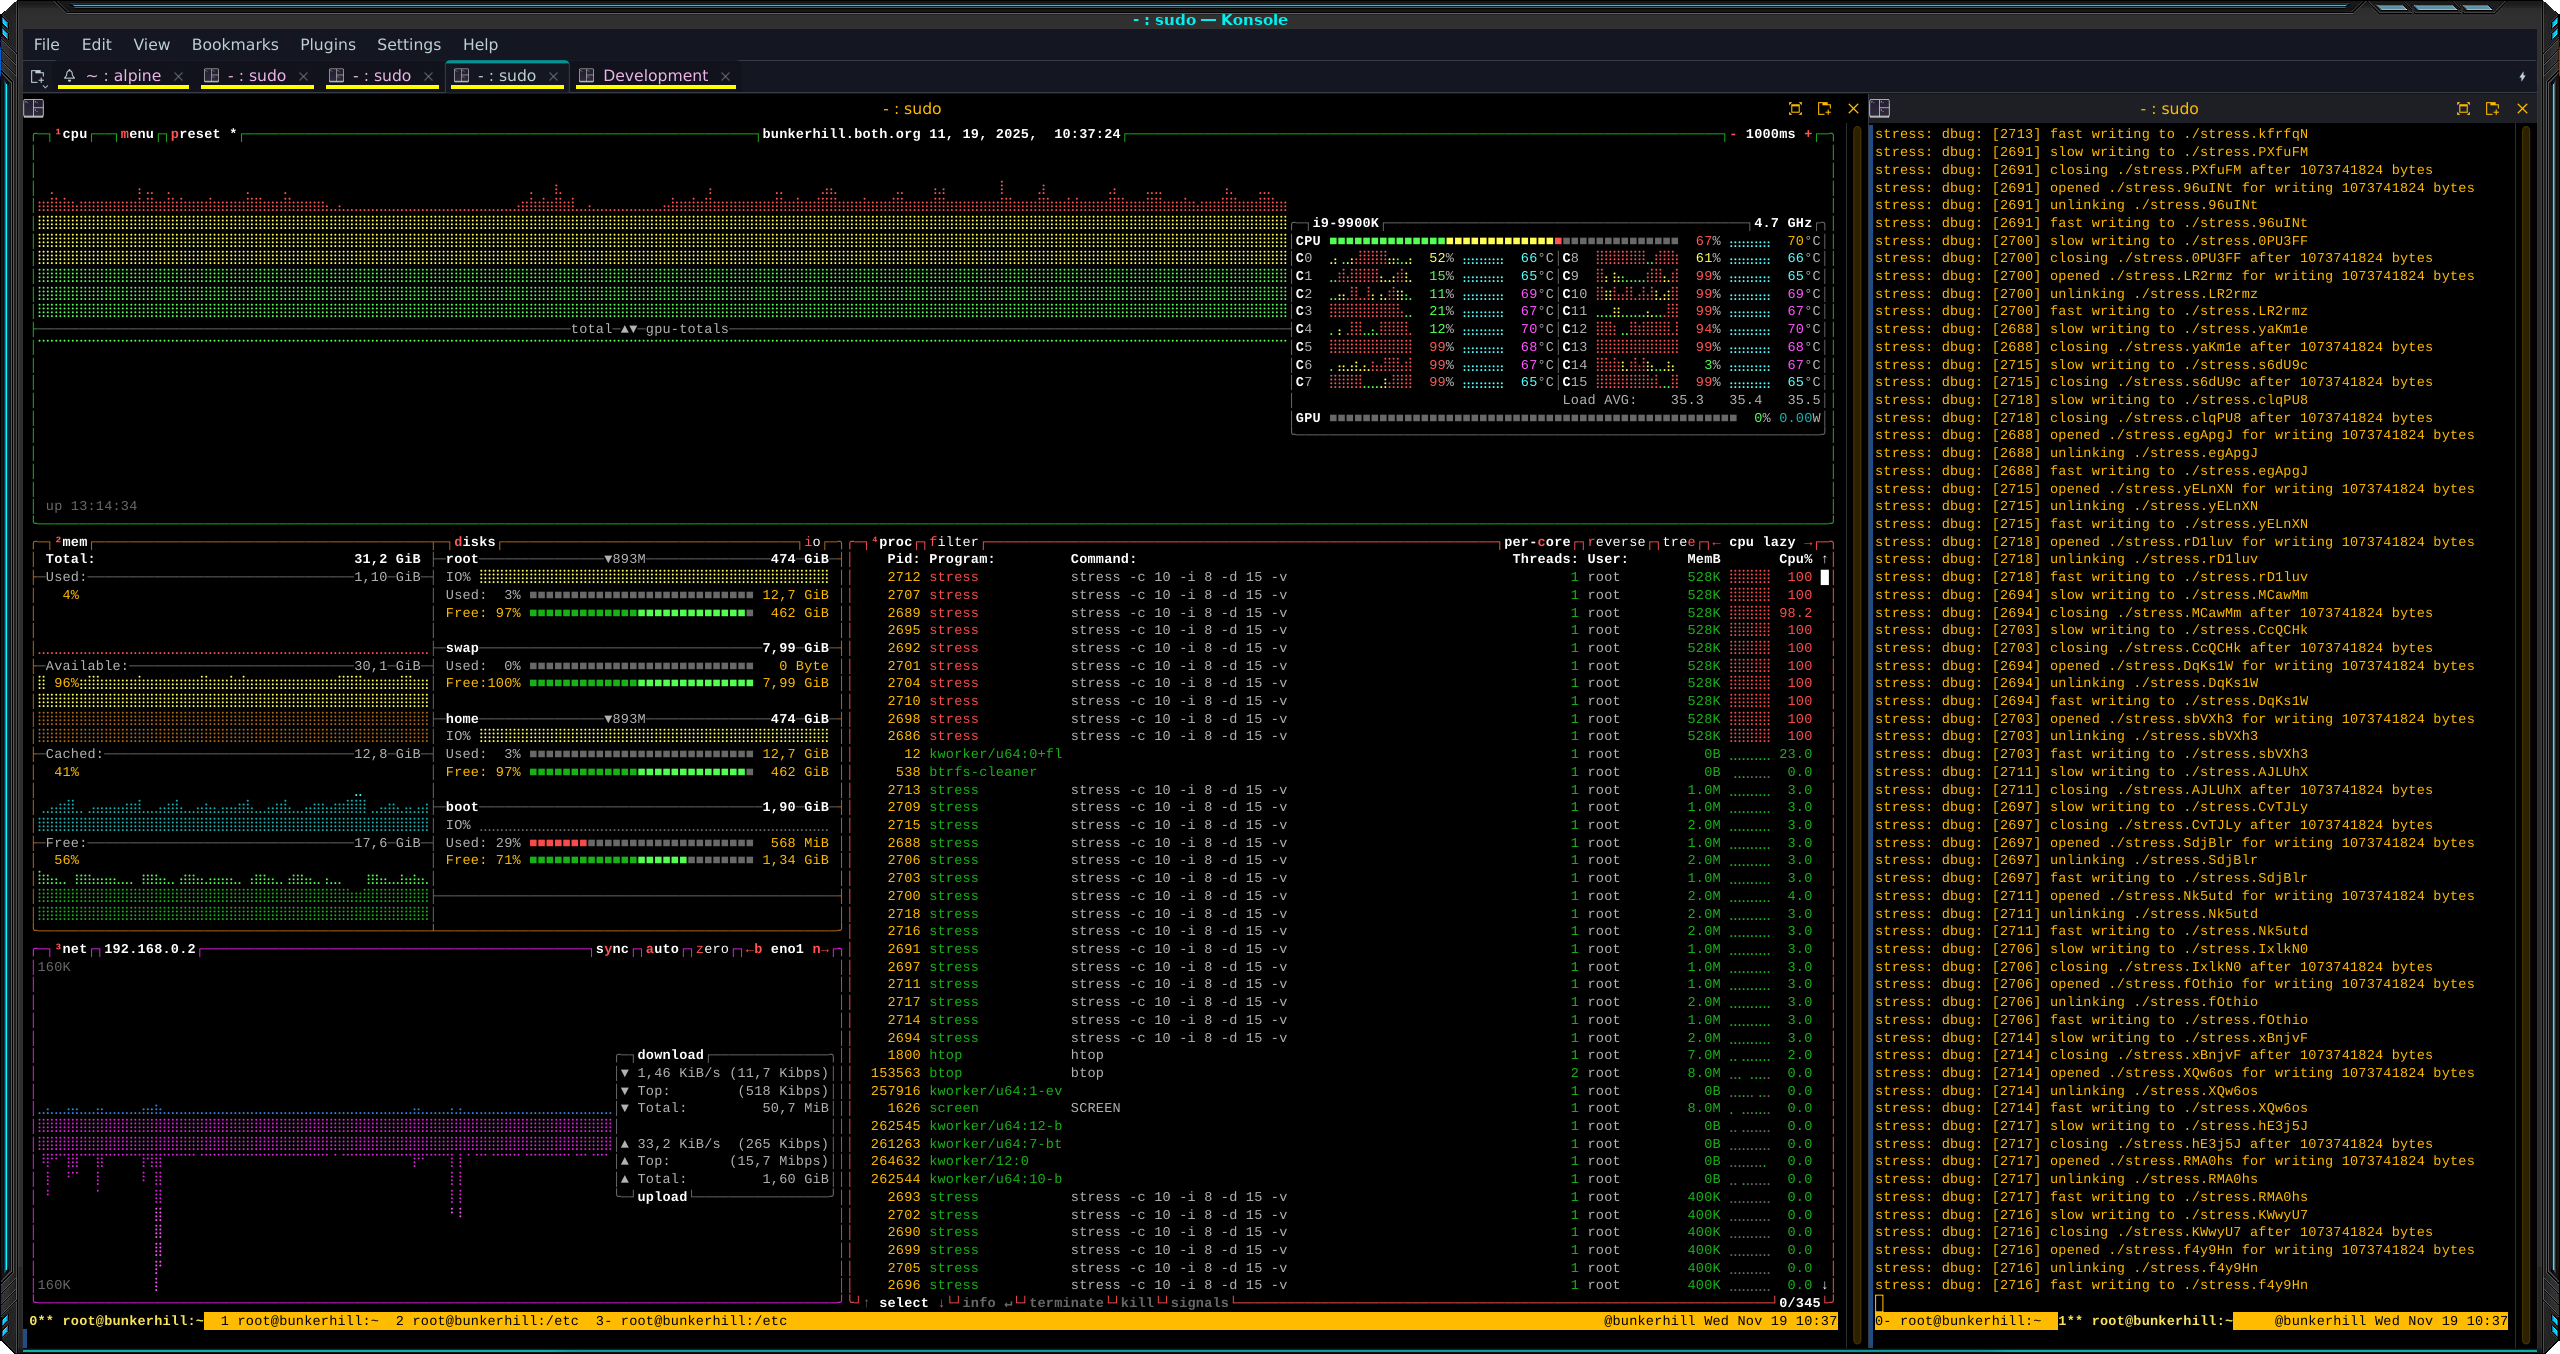
You can see in Figure 3, the CPU and disk I/O loads in more detail if you click on the image to enlarge it.
I plan to continue this stress test for about a week.
Next steps in the test plan
You may notice the LVM data for /dev/sda near the bottom of Figure 1. That’s the device that contains my pictures. After I’ve run this basic test for a few more days, I’ll convert it to BtrFS using the btrfs-convert tool. Then after a few more days of heavy testing, I’ll wipe out that sda device, convert it to BtrFS on a Linux type 83 partition, and test some more. I’m already keeping a good set of multiple backups of my data so I can revert to LVM/EXT4 and restore at any time.
Then I’ll move on to creating subvolumes. One step at a time for critical new things like filesystems.