Emulating systems with QEMU

I don’t do all of my open source work on Linux; sometimes, I need to run another system to do a specific task. It can be expensive to buy a system that’s dedicated to just one other system, especially if I don’t need to run that system all of the time.
One example that comes up a lot for me is my open source work with the FreeDOS Project. FreeDOS is an open source implementation of the classic DOS operating system, and it can run on any system that has an Intel CPU and a PC-compatible BIOS. I have a small ’386 laptop that I use when I want to run FreeDOS on real hardware, but for my day-to-day work, I prefer to use a virtual machine instead.
There are many virtual machines you can choose from. I like QEMU because it is flexible and supports different system architectures. It is also installed by default on most Linux systems, or at least available as a package that can be installed with a command like:
$ sudo dnf install qemuBooting with the defaults
Unlike other virtual machine systems like VirtualBox, you need to configure QEMU from the command line. This sounds hard, but QEMU defines some default values that make sense for most use cases, such as providing a keyboard, mouse, video, memory, and machine type. Let’s say I wanted to boot the FreeDOS 1.4 LiveCD. If you don’t want to get into the different ways to run QEMU, you can boot the LiveCD in QEMU using this command line:
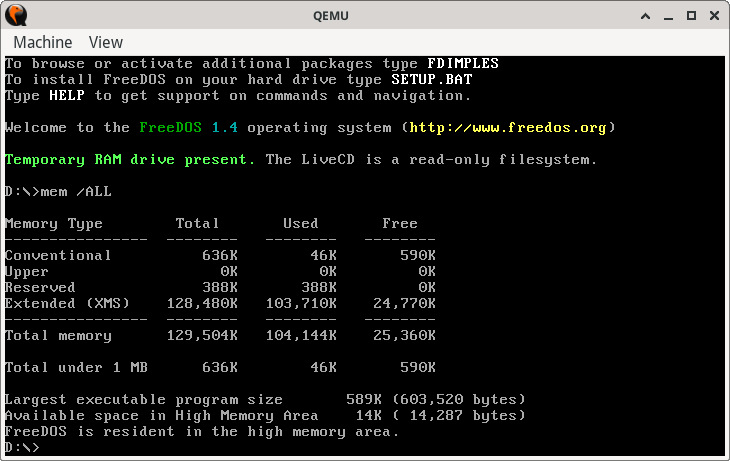
$ qemu-system-x86_64 -cdrom FD14LIVE.iso This sets up an x86 system with default values, and a CD-ROM drive attached to it, using the FD16LIVE.iso image file. The system will boot into the LiveCD where you can run commands, like the mem command to see the available memory available to FreeDOS:
However, the system will not run very well. Every command you run will have a delay. That’s because the virtual machine is emulating the CPU instructions through software. You can get better performance using the Kernel Virtual Machine (KVM) that’s built into the Linux kernel. To do that, add the -enable-kvm option to the command line:
$ qemu-system-x86_64 -enable-kvm -cdrom FD14LIVE.iso Command line options can go in any order, but I usually specify the KVM first so I don’t forget to use it. In general, I usually define the machine specifications up front, and any storage or other modifications last on the command line, but this is just my preference in typing the command line.
If you want to add more memory to the virtual machine, use the -m option and specify the amount of memory. Plain numbers are assumed to be megabytes but you can append G to indicate gigabytes. DOS is an old operating system from an era when computers counted memory in single-digit or double-digit megabytes, so I usually limit DOS to about 16 MB memory, which is more memory than I had in the computer that I took with me to university:
$ qemu-system-x86_64 -enable-kvm -m 16 -cdrom FD14LIVE.iso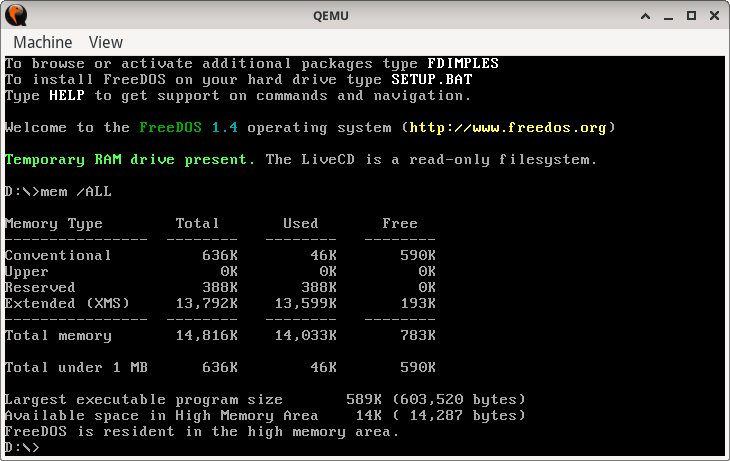
Adding storage
A virtual machine needs a hard disk to be useful, so you can write data back to the disk. To use a hard disk with QEMU, you first need to define a virtual disk image using the qemu-img command. By default, this creates img formatted disk images, which do not contain metadata. You can use QEMU with these disk images, but you will see warnings that QEMU needed to guess values for the disk, such as this:
WARNING: Image format was not specified for 'disk.img' and probing guessed raw.
         Automatically detecting the format is dangerous for raw images, write operations on block 0 will be restricted.
         Specify the 'raw' format explicitly to remove the restrictions.
Instead, I recommend the QCOW2 disk image format. This image format is also a little faster to use in QEMU. To define a QCOW2 disk image, specify the -f qcow2 option when creating a new disk image. For example, to create a disk image called disk.qcow2 that’s 5 MB in size, use this command line:
$ qemu-img create -f qcow2 disk.qcow2 5MYou can define larger disks using G to indicate gigabytes, such as 2G to define a 2 GB disk image.
Add the disk to the system using the -hda option. This uses the common Linux notation where -hda indicates an IDE disk drive. You can also add -hdb to indicate a second IDE disk drive.
However, I prefer to tell the virtual machine what device to boot from, using the -boot order option. This uses the DOS drive letters to indicate devices: a or b to indicate the first or second floppy drive, c for the first hard disk, or d to use the first CD-ROM drive. You can also boot from the by using n through p to indicate one of four network adapters. To boot FreeDOS using QEMU from the CD-ROM, use order=d to boot from the LiveCD:
$ qemu-system-x86_64 -enable-kvm -m 16 -hda disk.qcow2 -cdrom FD14LIVE.iso -boot order=dMy QEMU command line
You can specify all kinds of options to configure a QEMU virtual machine in a particular way. The command line can become quite long, so I prefer to save my standard boot options in a Bash script, so I can just type qemu and the script starts QEMU using my very long command line with my special configurations. This is the command line I use:
qemu-system-i386 -enable-kvm -m 32 -rtc base=localtime -audiodev pa,id=snd -machine pcspk-audiodev=snd -device sb16,audiodev=snd -device adlib,audiodev=snd -global i8042.kbd-throttle=on -hda freedos.qcow2 -hdb files.qcow2 -cdrom T2505BNS.isoThis has a lot of options, but we already know several items on this command line:
- I use a
i386machine for the QEMU virtual machine type, with 32 MB memory. - My first hard disk is
freedos.qcow2. I usually start with a fresh virtual disk every time I install a new version of FreeDOS. - My second hard disk is
files.qcow2, where I store all of my personal files and anything else I don’t want to lose whenever I reinstall FreeDOS. - The CD-ROM is
T2505BNS.iso, which is the FreeDOS Monthly Test Release from May 2025.
Some of the other command line options may be easier to understand if you pay close attention to the command line options:
- The virtual machine’s real time clock uses my computer’s local time.
- I set up an audio device using my Linux system’s Pulse Audio, called “snd.”
- I defined the virtual machine’s internal monaural PC speaker to generate tones through Pulse Audio (“snd”).
- I emulated a Sound Blaster 16 sound effects card, and an Ad Lib digital music card, both using Pulse Audio (“snd”).
The only option that’s a bit tricky is the extra -global i8042.kbd-throttle=on option. This activates a QEMU fix so that programs compiled with Borland (such as the IDE in Borland C or Borland Pascal) will read the keyboard correctly; Borland did a weird trick to read arrow keys which is not supported by the default keyboard configuration in QEMU.