Our computers are so powerful today that it’s hard for younger developers to understand what early desktop computing was like. Even more experienced folks can forget what it was like to boot an early desktop PC and run applications from floppy disks.
My computer has gobs of memory (32 GB), CPU cycles to spare (4-core Intel CPU at 3.1 GHz), and more disk space than I can use (256 GB NVME). This is an “average” computer in 2025. But in the 1980s, we measured CPU speeds in single-digit megaHertz and memory in kilobytes. Hard disks were rare and expensive in the early 1980s, yet so small compared to today: a 5 megabyte drive was quite large back then.
Let’s take a step back in time to see what it was like to use a computer like our primitive forebears might have done.
From small beginnings
For my experiment, I wanted to see how small a system could be, which meant using the fewest resources possible. I started by defining a 5 MB disk image in QEMU. By today’s standards, 5 MB is nothing; in the 1980s, in the era of the 360 kilobyte floppy disk, a 5 MB hard drive was huge.
$ qemu-img create -f qcow2 small.qcow2 5MTo do my experiment, I needed only a simple editor and a C compiler. FreeDOS 1.4 includes a bunch of modern tools, including a variety of editors and compilers. For example, the Open Watcom C compiler is quite nice, and I use that to write DOS programs. FreeDOS 1.4 also includes the IA-16 version of the GNU C Compiler, which is great if you want to have the same tool for DOS that you use on Linux. But both Open Watcom and GCC are quite large, so neither is suitable for my experiment on a tiny system.
FreeDOS also includes BCC (“Bruce’s C Compiler”), a very early C compiler that basically translates C code into Assembly language, then uses an Assembler to create DOS “COM” programs. BCC is quite small, only a few megabytes. That’s the one I used.
To install a minimum FreeDOS system, with a simple editor plus BCC, I needed to do a neat “trick” with QEMU. The FreeDOS 1.4 Live CD image is bootable, but BCC is provided on the Bonus CD. To access the Bonus CD, I need to load CD drivers, which I don’t plan to install on my tiny system. Instead, I started QEMU with two CD-ROM drives, plus my hard drive image:
$ qemu-system-i386 -enable-kvm -drive bus=0,unit=0,media=disk,file=small.qcow2 -drive bus=1,unit=0,media=cdrom,file=FD14LIVE.iso -drive bus=1,unit=1,media=cdrom,file=FD14BNS.iso -boot order=dThat’s a very long command line, but each -drive option tells QEMU to add a new drive to the virtual machine. QEMU emulates an IDE-based system, which can attach drives on bus 0 or 1, and each bus can have unit 0 or 1. So I connected my hard drive on bus 0 unit 0, and my two CD-ROM images on bus 1 (the Live CD on unit 0, and the Bonus CD on unit 1). This allows me to boot the FreeDOS 1.4 Live CD as D and still be able to access the packages on the Bonus CD as the E drive.
After that, it was a simple matter to use fdisk to partition the disk, reboot, format to create a DOS filesystem, and sys to transfer the system files.
The rest of the setup requires copying over files from the installation media to the new test disk. First, I copied the Edlin editor, which is a line-based editor for DOS, similar to the ed editor on Linux and Unix.
D:\>copy freedos\bin\edlin.exe C:
freedos\bin\edlin.exe =>> C:edlin.exe
Installing BCC requires extracting the zip package from the Bonus CD. FreeDOS recognized the second CD-ROM drive (that’s bus 1, unit 1) as the E drive, and that’s the Bonus CD. The packages for the FreeDOS installer are stored under a packages directory, and then a subdirectory for each package group; for example, the development packages are stored under packages\devel. FreeDOS packages are just zip files with extra metadata, which makes it easy to use the unzip command to extract BCC to the hard disk:
D:\>unzip E:\packages\devel\bcc.zip -d C:\This includes some extra files that I don’t need for this experiment: the metadata was extracted to an appinfo directory, and the source code was installed in a source directory. But BCC is so small that there’s no point in removing it. On a 5 MB disk, extracting the entire BCC package requires a little over 2 MB, which you can see if you run the dir command on the drive:
D:\>dir C:
 Volume in drive C is TEST
 Volume Serial Number is 1A3A-1F17

 Directory of C:\

APPINFO              <DIR>  05/03/2025 11:53p
DEVEL                <DIR>  05/03/2025 11:53p
SOURCE               <DIR>  05/03/2025 11:54p
COMMAND  COM        87,772  04/02/2025 10:22a
EDLIN    EXE        31,492  05/30/2024  6:33a
KERNEL   SYS        46,256  04/02/2025 10:22a
         3 file(s)        165,520 bytes
         3 dir(s)       2,809,856 bytes free
Booting the tiny system
With the new disk set up, I could boot this tiny system for the first time. I don’t need a lot of memory to go with this DOS machine. By default, DOS can only use the first 640 kB of memory; after that, you’re using either expanded memory or extended memory, depending on what driver you load. Since I didn’t install any drivers, this tiny system can only manage the conventional memory. That means 1 MB of memory using an old-style “ISA” PC will be enough for my needs.
$ qemu-system-i386 -machine isapc -m 1 -hda small.qcow2 When you boot the system for the first time, you’ll be prompted for the date and time. That’s because of how DOS boots: when the kernel starts up, it looks for a file called CONFIG.SYS that contains configuration information, such as where to find the command shell. If the kernel can’t find this file, it assumes certain defaults then loads the shell. When command.com starts up, it looks for a “batch” file called AUTOEXEC.BAT that it can run to set the DOS environment and run any initial commands. If that file doesn’t exist, command.com instead prompts the user for the date and time.
To get around this, create an initial AUTOEXEC.BAT file using the Edlin editor. I only need to set the search path for programs; the Edlin editor is at the “root” directory, and the C compiler programs are in \devel\bcc\bin.
C:\>edlin autoexec.bat
autoexec.bat: New file.
*a
 : PATH \\;\\devel\\bcc\\bin
 : .
*w
autoexec.bat: 1 line written
*q
Really quit (Y/N)? y
Edlin interprets the backslash to create “escaped” characters, like \n for a literal newline and \t for a tab. To insert a regular backslash, I had to use \\ instead.
With that AUTOEXEC.BAT file, whenever I reboot the system, I’ll immediately set the search path, and the shell will put me at a command prompt. You can add other commands to the AUTOEXEC.BAT file, such as aliases to other commands. For example, Linux users might be more comfortable typing ls instead of dir to list the files in the current directory, or rm instead of del to delete files, and cat instead of type to display the contents of files. You can use Edlin to modify the AUTOEXEC.BAT file by appending (the a command) these commands to the file:
C:\>edlin autoexec.bat
autoexec.bat: 1 line read
*a
 : alias ls=dir /o:ne /l /b /w
 : alias rm=del
 : alias cat=type
 : .
*w
autoexec.bat: 4 lines written
*q
Really quit (Y/N)? y
In this example, I’ve added a few options to the dir command to make the output look like ls on Linux: /o:ne sorts (orders) the file list by name then extension, /l displays filenames in lowercase, /b creates a “bare” listing without the usual information about the disk size or volume label, and /w displays a “wide” listing. If you “run” the AUTOEXEC.BAT file, you’ll see each instruction as the shell executes it. This will set the search path and define the macros:
C:\>autoexec.bat
C:\>PATH \;\devel\bcc\bin
C:\>alias ls=dir /o:ne /l /b /w
C:\>alias rm=del
C:\>alias cat=type
Now my tiny DOS system “feels” a bit more like Linux:
C:\>ls
[appinfo]      autoexec.bak   autoexec.bat   command.com    [devel]
edlin.exe      kernel.sys     [source]
Writing our first program
One program that I like to have at hand is an ASCII chart. Traditional ASCII defines only the values from 0 to 127, and the printable values start at ASCII 32 (space). DOS defines an extended character set that goes up to 255. Let’s use Edlin to write a simple program to iterate through the printable characters from 32 to 255.
C:\>mkdir src

C:\>cd src

C:\SRC>edlin ascii.c
ascii.c: New file.
*i
 : #include <stdio.h>
 :
 : int main()
 : {
 :   int row,col;
 :
 :   for (row=32; row<255; row+=16) {
 :     for (col=0; col<16; col++) {
 :       putchar(row+col);
 :       putchar(' ');
 :     }
 :     putchar('\\n');
 :   }
 :
 :   return 0;
 : }
 : .
*w
ascii.c: 16 lines written
*q
Really quit (Y/N)? y
To write the output as a “table,” I’ll step through “row” values starting at 32, incrementing each row by 16. Within each row, I’ll print 16 characters starting at the initial “row” value.
C:\SRC>bcc -o ascii.com ascii.c

C:\SRC>ascii
  ! " # $ % & ' ( ) * + , - . /
0 1 2 3 4 5 6 7 8 9 : ; < = > ?
@ A B C D E F G H I J K L M N O
P Q R S T U V W X Y Z [ \ ] ^ _
` a b c d e f g h i j k l m n o
p q r s t u v w x y z { | } ~ ⌂
Ç ü é â ä à å ç ê ë è ï î ì Ä Å
É æ Æ ô ö ò û ù ÿ Ö Ü ¢ £ ¥ ₧ ƒ
á í ó ú ñ Ñ ª º ¿ ⌐ ¬ ½ ¼ ¡ « »
░ ▒ ▓ │ ┤ ╡ ╢ ╖ ╕ ╣ ║ ╗ ╝ ╜ ╛ ┐
└ ┴ ┬ ├ ─ ┼ ╞ ╟ ╚ ╔ ╩ ╦ ╠ ═ ╬ ╧
╨ ╤ ╥ ╙ ╘ ╒ ╓ ╫ ╪ ┘ ┌ █ ▄ ▌ ▐ ▀
α ß Γ π Σ σ µ τ Φ Θ Ω δ ∞ φ ε ∩
≡ ± ≥ ≤ ⌠ ⌡ ÷ ≈ ° ∙ · √ ⁿ ² ■
As a programmer, it’s more useful to know the ASCII values for each character, usually in hexadecimal notation. Let’s update the program to add starting hex values to each row:
C:\SRC>edlin ascii.c
ascii.c: 16 lines read
*l
1:*#include <stdio.h>
2:
3: int main()
4: {
5:   int row,col;
6:
7:   for (row=32; row<255; row+=16) {
8:     for (col=0; col<16; col++) {
9:       putchar(row+col);
10:       putchar(' ');
11:     }
12:     putchar('\n');
13:   }
14:
15:   return 0;
16: }
*8i
 :     printf("%x ", row);
 : .
*w
ascii.c: 17 lines written
And again to add the column headers:
*6i
 :
 :   fputs("-- ", stdout);
 :   for (col=0; col<16; col++) {
 :     printf("%x ", col);
 :   }
 :   putchar('\\n');
 : .
*w
ascii.c: 23 lines written
*q
Really quit (Y/N)? y
This generates a nice table that makes it easy to reference characters by value:
C:\SRC>bcc -o ascii.com ascii.c

C:\SRC>ascii
-- 0 1 2 3 4 5 6 7 8 9 a b c d e f
20   ! " # $ % & ' ( ) * + , - . /
30 0 1 2 3 4 5 6 7 8 9 : ; < = > ?
40 @ A B C D E F G H I J K L M N O
50 P Q R S T U V W X Y Z [ \ ] ^ _
60 ` a b c d e f g h i j k l m n o
70 p q r s t u v w x y z { | } ~ ⌂
80 Ç ü é â ä à å ç ê ë è ï î ì Ä Å
90 É æ Æ ô ö ò û ù ÿ Ö Ü ¢ £ ¥ ₧ ƒ
a0 á í ó ú ñ Ñ ª º ¿ ⌐ ¬ ½ ¼ ¡ « »
b0 ░ ▒ ▓ │ ┤ ╡ ╢ ╖ ╕ ╣ ║ ╗ ╝ ╜ ╛ ┐
c0 └ ┴ ┬ ├ ─ ┼ ╞ ╟ ╚ ╔ ╩ ╦ ╠ ═ ╬ ╧
d0 ╨ ╤ ╥ ╙ ╘ ╒ ╓ ╫ ╪ ┘ ┌ █ ▄ ▌ ▐ ▀
e0 α ß Γ π Σ σ µ τ Φ Θ Ω δ ∞ φ ε ∩
f0 ≡ ± ≥ ≤ ⌠ ⌡ ÷ ≈ ° ∙ · √ ⁿ ² ■
We can use the extended characters to define a nice-looking border around the table, so the table is easier to read. Let’s use the vertical bar character (0xb3) for the left border, the horizontal bar character (0xc4) for the top border, and the cross bar character (0xc5) for the intersection:
C:\SRC>edlin ascii.c
ascii.c: 23 lines read
*1,10l
1:*#include <stdio.h>
2:
3: int main()
4: {
5:   int row,col;
6:
7:   fputs("-- ", stdout);
8:   for (col=0; col<16; col++) {
9:     printf("%x ", col);
10:   }
*7
7:*  fputs("-- ", stdout);
7:   fputs("--", stdout);
*8i
 :   putchar(0xb3);
 : .
*5,15l
5:   int row,col;
6:
7:   fputs("--", stdout);
8:   putchar(0xb3);
9:*  for (col=0; col<16; col++) {
10:     printf("%x ", col);
11:   }
12:   putchar('\n');
13:
14:   for (row=32; row<255; row+=16) {
15:     printf("%x ", row);
*13i
 :
 :   putchar(0xc4); putchar(0xc5);
 :   for (col=0; col<16; col++) {
 :     putchar(0xc4); putchar(0xc4);
 :   }
 :   putchar('\\n');
 : .
*15,25l
15:   for (col=0; col<16; col++) {
16:     putchar(0xc4); putchar(0xc4);
17:   }
18:   putchar('\n');
19:*
20:   for (row=32; row<255; row+=16) {
21:     printf("%x ", row);
22:     for (col=0; col<16; col++) {
23:       putchar(row+col);
24:       putchar(' ');
25:     }
*21
21:*    printf("%x ", row);
21:     printf("%x", row); putchar(0xb3);
*w
ascii.c: 30 lines written
*q
Really quit (Y/N)? y
If we compile and run this program, we’ll see this has a small bug; the program should print two horizontal bar characters (0xc4) for the top border, but it only prints one:
C:\SRC>bcc -o ascii.com ascii.c

C:\SRC>ascii
--│0 1 2 3 4 5 6 7 8 9 a b c d e f
─┼────────────────────────────────
20│  ! " # $ % & ' ( ) * + , - . /
30│0 1 2 3 4 5 6 7 8 9 : ; < = > ?
40│@ A B C D E F G H I J K L M N O
50│P Q R S T U V W X Y Z [ \ ] ^ _
60│` a b c d e f g h i j k l m n o
70│p q r s t u v w x y z { | } ~ ⌂
80│Ç ü é â ä à å ç ê ë è ï î ì Ä Å
90│É æ Æ ô ö ò û ù ÿ Ö Ü ¢ £ ¥ ₧ ƒ
a0│á í ó ú ñ Ñ ª º ¿ ⌐ ¬ ½ ¼ ¡ « »
b0│░ ▒ ▓ │ ┤ ╡ ╢ ╖ ╕ ╣ ║ ╗ ╝ ╜ ╛ ┐
c0│└ ┴ ┬ ├ ─ ┼ ╞ ╟ ╚ ╔ ╩ ╦ ╠ ═ ╬ ╧
d0│╨ ╤ ╥ ╙ ╘ ╒ ╓ ╫ ╪ ┘ ┌ █ ▄ ▌ ▐ ▀
e0│α ß Γ π Σ σ µ τ Φ Θ Ω δ ∞ φ ε ∩
f0│≡ ± ≥ ≤ ⌠ ⌡ ÷ ≈ ° ∙ · √ ⁿ ² ■
Let’s make the final bug fix with Edlin:
C:\SRC>edlin ascii.c
ascii.c: 30 lines read
*10,20l
10:     printf("%x ", col);
11:   }
12:   putchar('\n');
13:
14:   putchar(0xc4); putchar(0xc5);
15:   for (col=0; col<16; col++) {
16:     putchar(0xc4); putchar(0xc4);
17:   }
18:   putchar('\n');
19:
20:   for (row=32; row<255; row+=16) {
*14
14:*  putchar(0xc4); putchar(0xc5);
14:   putchar(0xc4); putchar(0xc4); putchar(0xc5);
*w
ascii.c: 30 lines written
*q
Really quit (Y/N)? y
The new program generates a very nice-looking “extended” ASCII table:
C:\SRC>bcc -o ascii.com ascii.c

C:\SRC>ascii
--│0 1 2 3 4 5 6 7 8 9 a b c d e f
──┼────────────────────────────────
20│  ! " # $ % & ' ( ) * + , - . /
30│0 1 2 3 4 5 6 7 8 9 : ; < = > ?
40│@ A B C D E F G H I J K L M N O
50│P Q R S T U V W X Y Z [ \ ] ^ _
60│` a b c d e f g h i j k l m n o
70│p q r s t u v w x y z { | } ~ ⌂
80│Ç ü é â ä à å ç ê ë è ï î ì Ä Å
90│É æ Æ ô ö ò û ù ÿ Ö Ü ¢ £ ¥ ₧ ƒ
a0│á í ó ú ñ Ñ ª º ¿ ⌐ ¬ ½ ¼ ¡ « »
b0│░ ▒ ▓ │ ┤ ╡ ╢ ╖ ╕ ╣ ║ ╗ ╝ ╜ ╛ ┐
c0│└ ┴ ┬ ├ ─ ┼ ╞ ╟ ╚ ╔ ╩ ╦ ╠ ═ ╬ ╧
d0│╨ ╤ ╥ ╙ ╘ ╒ ╓ ╫ ╪ ┘ ┌ █ ▄ ▌ ▐ ▀
e0│α ß Γ π Σ σ µ τ Φ Θ Ω δ ∞ φ ε ∩
f0│≡ ± ≥ ≤ ⌠ ⌡ ÷ ≈ ° ∙ · √ ⁿ ² ■ 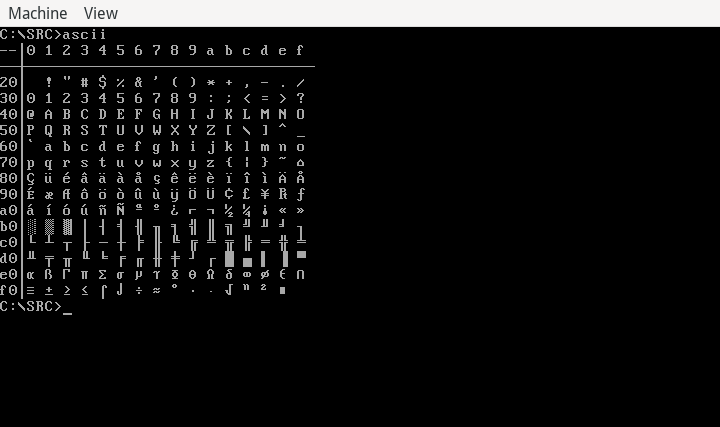
Here’s the full listing, if you want to try this out on your own:
#include <stdio.h>

int main()
{
  int row,col;

  fputs("--", stdout);
  putchar(0xb3);
  for (col=0; col<16; col++) {
    printf("%x ", col);
  }
  putchar('\n');

  putchar(0xc4); putchar(0xc4); putchar(0xc5);
  for (col=0; col<16; col++) {
    putchar(0xc4); putchar(0xc4);
  }
  putchar('\n');

  for (row=32; row<255; row+=16) {
    printf("%x", row); putchar(0xb3);
    for (col=0; col<16; col++) {
      putchar(row+col);
      putchar(' ');
    }
    putchar('\n');
  }

  return 0;
}
Code like it’s the 1980s
With only an editor and C compiler, you can create your own programs to do things the way you want to do them. This is just a simple example to create an ASCII table of the DOS extended character set. From this starting point, you can create your own programs to do all kinds of things.
While BCC is a tiny C compiler, it’s also incomplete. The documentation describes BCC as “a simple C compiler that produces 8086 assembler” and notes that the compiler “understands traditional K&R C.” To use ANSI C prototypes, you must add the -ansi command line option, although the BCC documentation warns that “it is definitly NOT a true ansi-C compiler.”
At the same time, it’s important to note that Dennis Ritchie created the C programming language around 1972, and C gained popularity throughout the 1980s. The “ANSI C” version was established in 1989, so this “incomplete” BCC implementation would have been similar to other C compilers available during the 1980s.
If you’re interested in retrocomputing and retroprogramming, download the FreeDOS 1.4 distribution and set up your own tiny retro environment where you can code like it’s the 1980s.