Host your own apps with Yunohost

Yunohost is a Linux distribution that provides an easy way to install and manage public services for your friends or for an entire organization.
Like any Linux distribution, you can install it on nearly any spare computer you happen to have, connect it to the Internet, point a fully-qualified domain name at its IP address, and you’ve got a public server.
Unlike any other Linux distribution, though, Yunohost features a web-based administrative interface with one-click installs of popular software, like Nextcloud, Wireguard VPN, Etherpad, Discourse forum, Jupyter for Python, Pi-hole ad blocker, a Tor relay, Element chat client, Jitsi, Jellyfin media client, Borg Backup, Roundcube email client, Gitea, Mattermost, and much much more.
You can stop struggling to install online apps from source code repositories, and let Yunohost’s custom install scripts do all the work for you.
Get a domain name and create DNS records
For your friends to reach Yunohost over the Internet, your server must have a fully-qualified domain name.
There are lots of domain name registrars out there, including Gandi.net, Namecheap, and sometimes there are local companies like Domains Direct (for me, that’s local) offering domain names for a specific region.
After you register a domain name, the registrar provides a DNS configuration panel so you can edit what IP address the domain name points to. You must set the A Name (or AAAA Name, if you’re using IPv6) to your Yunohost’s public IP address. Your public IP address is different from the Local IP address displayed on the Yunohost login screen.
To get your public IP address, go to icanhazip.com. The number it returns is your public IP address.
In addition to an A Name, create a CNAME record that points www. followed by your domain name to just your domain name. This ensures that you can get to your server whether you type www.example.com or just example.com into a web browser.
Some applications on Yunohost require their own subdomain. You’ve already made one subdomain, when you created a CNAME for the www. version of your domain.
Any time an app on Yunohost tells you that it requires its own subdomain, just log in to your domain name registrar’s DNS record editor and create a new CNAME record.
For example, before installing the online spreadsheet Grist, I created a subdomain sheets.example.com pointing to example.com.
Install Yunohost
To install Yunohost, you need either a dedicated computer, because it’s an entire operating system and not just an application. I use an old Toshiba laptap from 2016, but you can use a brand new rack server or a spare NUC or Raspberry Pi. Alternately, you can run Yunohost as a virtual machine or even as a WSL image.
Download what you need from yunohost.org/en/install. This article assumes you’re using Yunohost on a dedicated computer, and in the context of Yunohost that makes the computer a server (even if it only looks like an old laptop hidden away in your wardrobe).
After you’ve got your install image, you must “flash” it to a USB thumbdrive using Etcher.
Be warned! This process erases your USB thumbdrive, so do this on an empty USB thumbdrive or one you don’t care about!
To boot your target computer using Yunohost, attach your USB thumbdrive to it and then power it on. Moments after powering it on, you must press what’s sometimes called a “snag” key on the keyboard. The key differs depending on what firmware the computer happens to be running on its motherboard. Often it’s F2 or F8 or the Del key, but whatevery it is, the first greeting screen you see usually tells you. It may only be on screen for a second or two, so if you have to power down and try again, that’s OK. If worse comes to worse, try the F-keys in sequence, and the Del and Esc keys, or consult the computer manufacturer’s documentation online.
Once you’ve booted your computer from the Yunohost thumbdrive, step through the installation interface. You need to choose what kind of keyboard layout you’re using, and set your location and date and time, and so on.
Installing a new operating system on a computer erases everything that was stored on that computer.
Do NOT perform an install on anything that contains data you care about, no exceptions!
Wait for Yunohost to install (it can take 30 to 45 minutes, depending on the speed of the USB bus and hard drive of the computer).
Once it’s finished, power down and remove the USB thumbdrive, and then power the computer on as usual.
No snag key is required now, because Yunohost is the only operating system on the computer.
The computer running Yunohost must be connected to your network.
First boot
After you first boot up Yunohost, you’re greeted by a black screen with a login prompt and some data about the computer, including its local IP address. Don’t try to log in on this screen, even if you’re an expert Linux user except to obtain its local IP address. Instead, use Yunohost’s browser-based user interface.
To login to your new Yunohost server, open a web browser on your computer (the computer you use every day, which in this context is a client). Navigate to your Yunohost server’s IP address as listed on the login screen of your server.
Complete the installation process in the web interface.
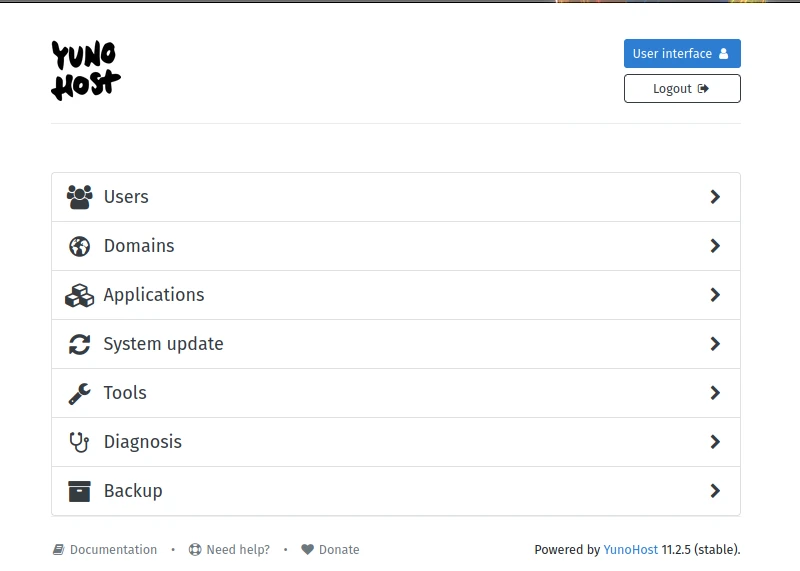
After you’ve created a user and added your domain name, you’re ready to use Yunohost. You interact with Yunohost entirely through your web browser, and its interface is designed to focus on just the things a web server needs to function.
Configure your router and firewall
Now that everything’s installed, you must make it so that your router doesn’t reject all traffic intended for your Yunohost server. By default, your router is configured to block uninvited incoming traffic from the Internet. But you’re running a server now, and you expect uninvited traffic. Your users are going to try to reach your Yunohost server, so you need your router to forward all requests for the server hosting your domain name to your Yunohost server.
Every router is different, so this is a step you have to figure out for yourself, but I can provide some general direction. In your router interface, there’s a section called NAT forwarding or Port forwarding or Virtual servers or something like that. Look for a control panel that allows you to forward a Service Type from an external port to an internal IP.
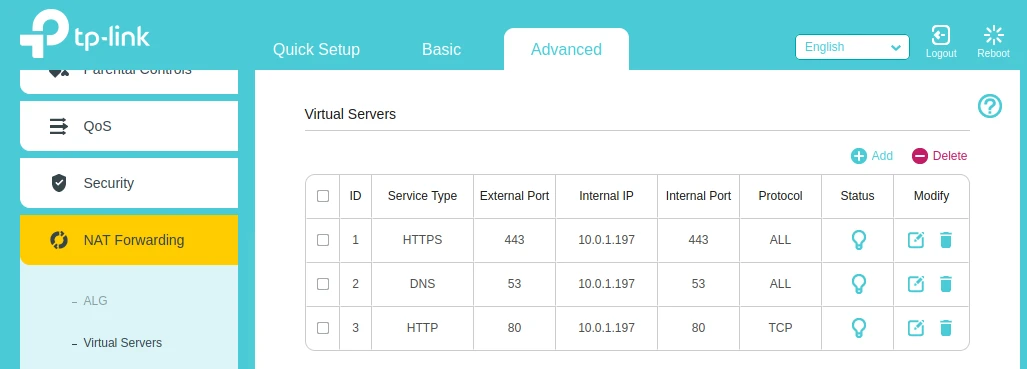
You must set incoming traffic from ports 80 and 443 to go to the Local IP address (that’s the one listed on the Yunohost login screen) of your Yunohost server.
This ensures that when someone types your domain name into a web browser, the traffic sent to your public IP is accepted by your router, but forwarded exclusively to your Yunohost server.
Installing an application
To install an application on Yunohost, click the Applications link in the Yunohost admin screen. Click the green Install button in the top right to see the application catalogue.
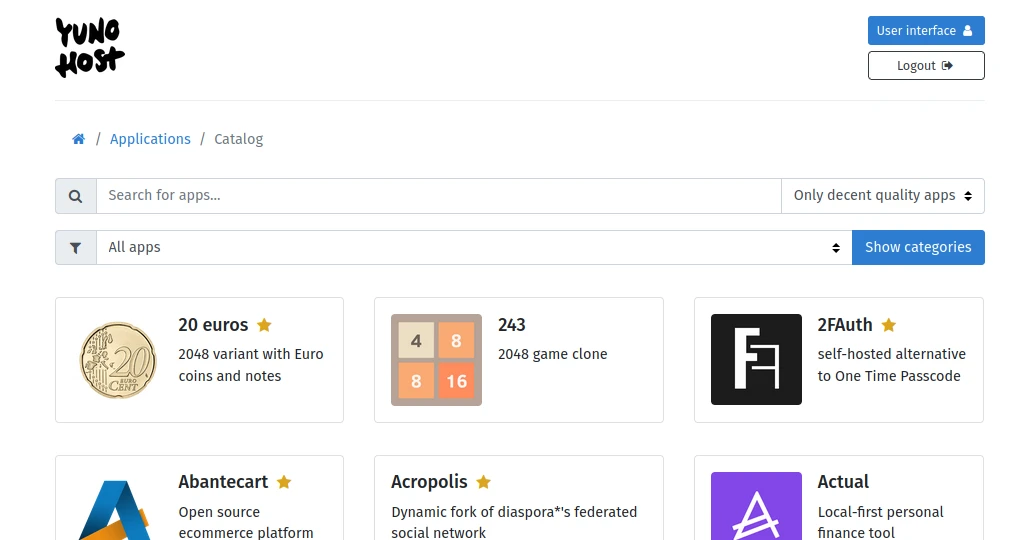
I admit that I haven’t counted, but there are at least over a hunded apps available as one-click installs. Pick one that solves a problem for you and your friends, and install it.
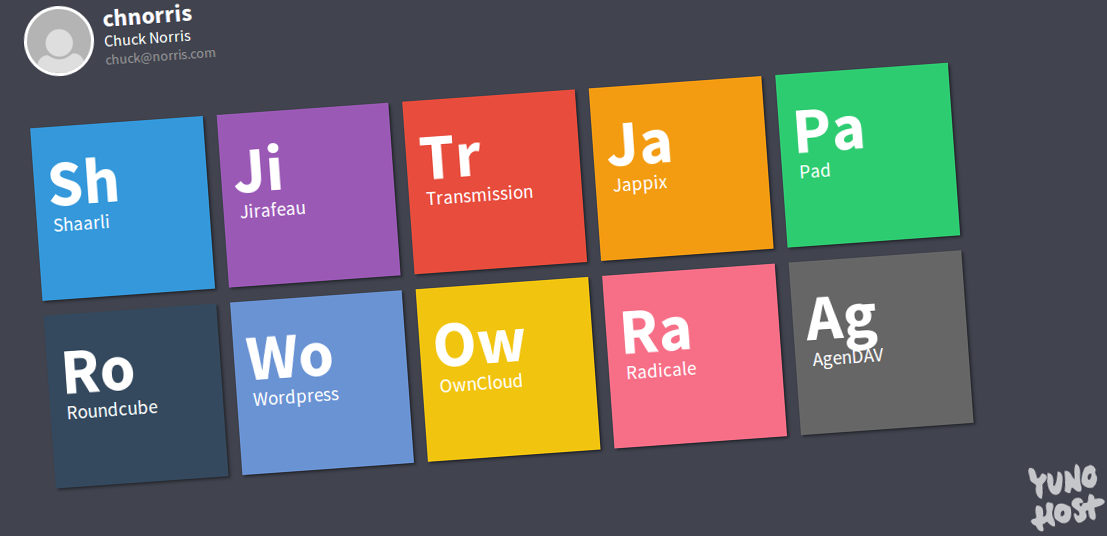
Some apps can be installed to a subdirectory on your server, others require a subdomain. After an app is installed, you can reach it by navigating to your domain name, or by using its subdomain (such as sheets.example.com) or full URL path (such as example .com/grist). Navigating to the domain name of your Yunohost server also provides a home panel that lists all available applications. Those apps that require authentication have login screens of their own, so just because there’s a link to an app doesn’t mean everybody can get in.
Server made simple
Yunohost makes it possible for anybody to administer their own public app server. You’re not exactly building your own cloud (you don’t have near enough compute nodes to qualify for that, and no control plane) but functionally that’s what you have: an online home for you and your friends or organization, with useful apps that allows users to stop using proprietary and often predatory online services, and to use open source web apps hosted by a trusted admin instead.
Being a sysadmin is a great responsibility, though. Once you start offering services online to friends, you’ve got a reputation to build. Users expect reliability, availability, and they’re trusting you with their data. You may be running Yunohost on a spare computer, but once you start hosting other people’s data, you owe it to them to do regular backups, to buffer your server from power outages or surges using a battery backup unit, and the assurance that you’re not going to close up shop without at least a month’s notice beforehand.
Ensuring a positive and safe and reliable experience for your users helps build trust in sysadmins everywhere, so be a part of the solution, and let Yunohost make it easy for you!