Get started with Midnight Commander, a visual shell and file manager for Linux

Midnight Commander is a text-based Command Line Interface (“CLI”) program. It is particularly useful when a GUI is not available but can also be used as a primary file manager in a terminal session even when you are using a GUI. I use Midnight Commander frequently because I often have need to interact with local and remote Linux computers using the CLI. Midnight Commander can be used with almost any of the common shells and remote terminals through SSH.
The man page for Midnight Commander calls it a visual shell because it’s capabilities are greater than the file manager we usually use it as. This article will provide you with enough information to get started using Midnight Commander as a file manager as well as its other capabilities.
Getting started
There are two things that need to be done for Midnight Commander to work properly. Of course, Midnight Commander must be installed, but we also need to configure your terminal emulator to respond correctly to the function keys used by Midnight Commander to initiate many of its functions. I have found that the Xfce4 Terminal works best of all the terminal emulators I’ve tried so far. The Cool Retro Term (“CRT”) emulator also works well.
I had to make a configuration change to the Xfce4 Terminal to cause it to pass the function keys on to Midnight Commander, or any other program running in the terminal. Open the configuration menu for the Xfce4 Terminal and click on the Advanced tab. Add check marks to both items in the Shortcuts section as in Figure 1. This works best for me but if you use shortcuts other than the function keys you may want to leave “Disable all menu access keys…” unchecked. You can click on most of the images in this article to open larger versions.
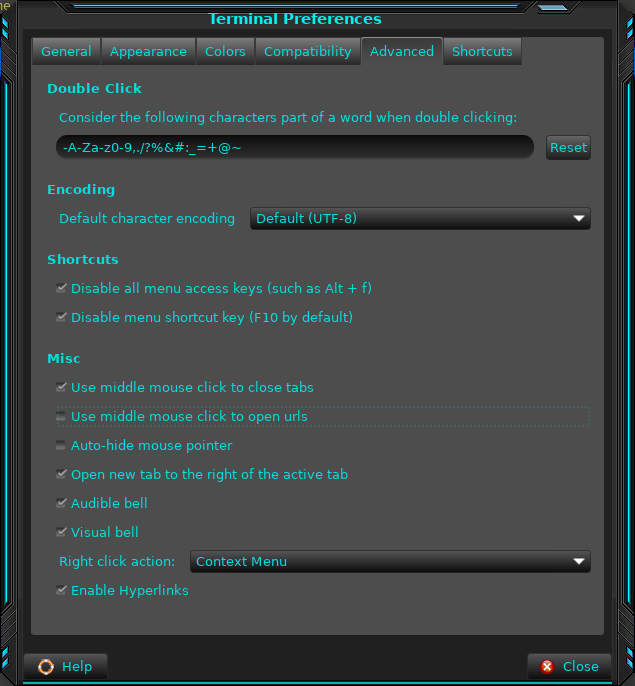
I then went to the Shortcuts tab and cleared the “Contents” shortcut. This was set to F1 which prevents Midnight Commander from opening its built-in Help with an F1 keystroke.
Next I created a test user on my main workstation so I could experiment with Midnight Commander for this article. This is much safer than using my own user account so I suggest that you do the same. I created the user “test user”, tuser, as root. I then logged into that account using the GUI login because the default directories are only created when the user first performs a login to the GUI desktop. I then opened a terminal session, made ~/Documents the working directory and created a few hundred files with the following command. Each file contains a string with its own name:
tuser@david:~/Documents$ for X in `seq -w 200`;do echo "Hello world file$X" > testfile$X ; echo "This is file test$X" > test$X ; echo "This is file$X" > file$X ; doneMidnight Commander might already be installed on your distribution, but if it is not you can install it using your distribution’s package manager. For Fedora, my distro of choice, I use the DNF utility. Use this command as the root user to install Midnight Commander.
# dnf -y install mcYou can start Midnight Commander from the CLI with the mc command. Just type mc and press the Enter key. Figure 2 shows Midnight Commander when run as a non-root user in a terminal emulator session.
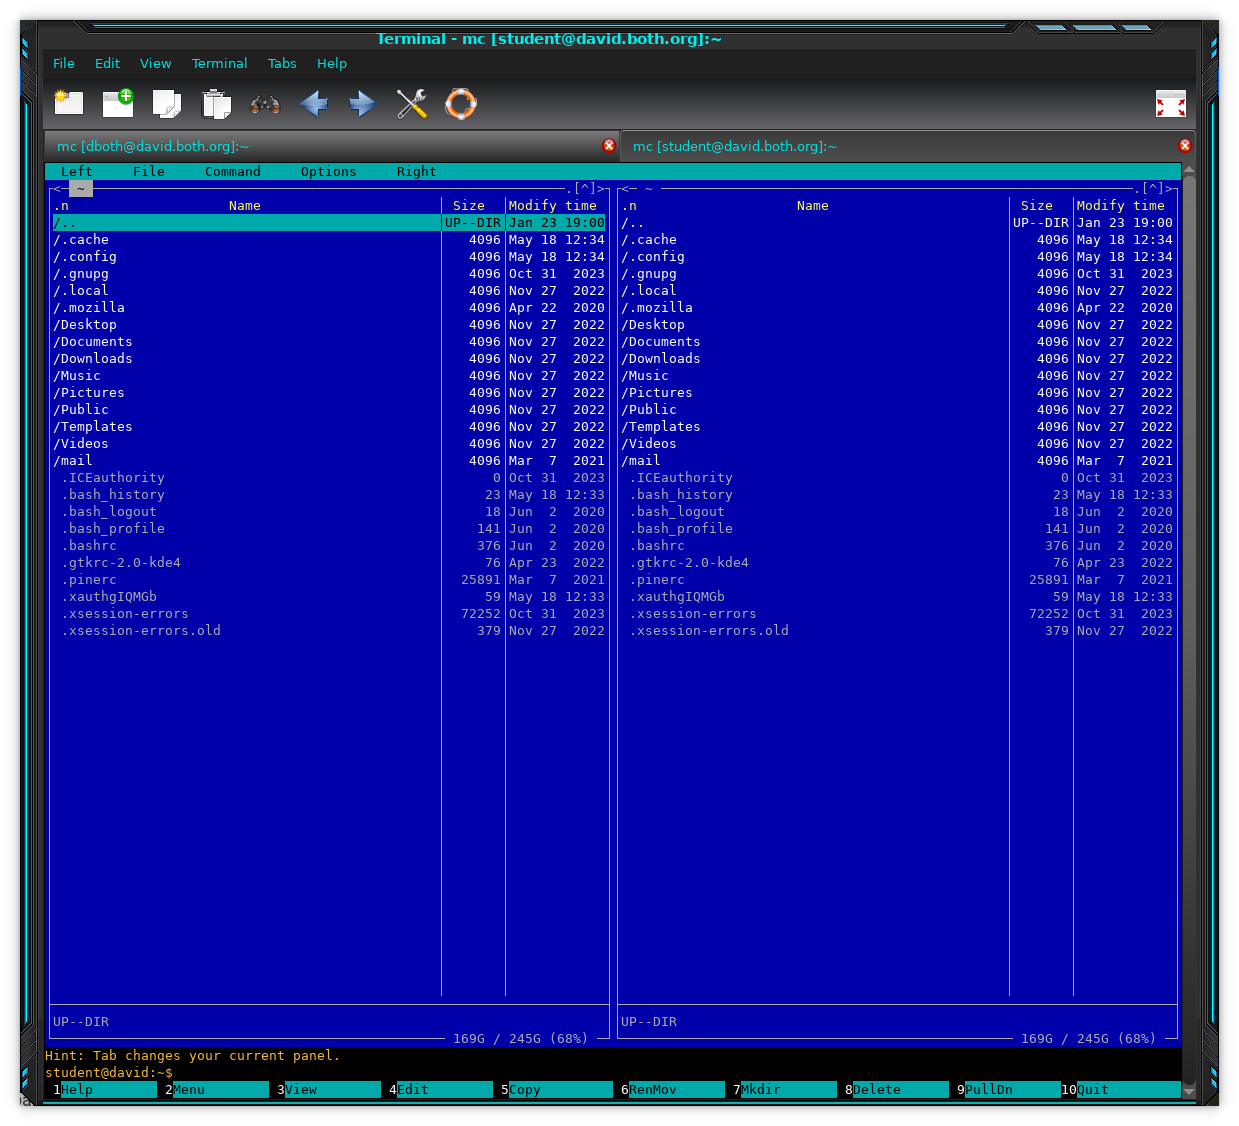
The user interface for Midnight Commander is two text-mode file panels, left and right, which each display the contents of a directory. By default, that’s your home directory. The top of each panel displays the name of the current directory for that panel. The bottom portion of the interface displays information about the file or directory highlighted in each panel, a hint feature, and a line of function key labels; you can simply press the function key on your keyboard that corresponds to the function you want to perform or you can use the mouse to click on the desired button.
The Basics
When used in a terminal session as part of a GUI desktop, Midnight Commander is mouse-aware. Clicking on a file will select it, clicking on a menu item or a function key button will launch that menu or function.
You can use the mouse and click on the menu items, or press the F9 key to open the pull-down menus. Once the menu is opened, you can select a different one on the menu bar by using the Right and Left arrow keys. The Up or Down arrow keys are used to select one of the items in the current menu. Simply press the Enter key to activate the selected menu item.
Configuration of the panels is accomplished by selecting the Left or Right menu item from the menu bar. You can select the content of the panel, such as detailed information about the file selected in the other panel or a tree view. You can also connect to a remote computer using FTB, SMB, SFTP, or a “Shell” link using the FISH protocol.
Most menus can be dismissed by pressing the Esc key twice or by pressing the F10 key once.
File system navigation
Navigation of the filesystem in the directory panes is accomplished with the arrow and tab keys. The Up or Down arrow keys allow selecting a file or directory. Press the Enter key to enter a highlighted directory. Select the double dot (..) entry and press the Enter key to navigate to the parent of the current directory. Use the Tab key to switch between the two directory panes.
Navigation and menu selections can also be made with the mouse if you are running Midnight Commander in a terminal session on a GUI desktop. Just single click on any menu item, file, or directory to select it.
Basic file operations
One you have located and highlighted a file on which you want to perform some action, the function keys provide shortcuts to basic file operations such as copy, move, delete and so on.
To delete a file, for example, locate the desired files, highlight them, and press the F8 key to delete the file or files. Midnight Commander will display a pop-up that asks whether you really want to delete the file or files and you answer “Yes” to that to complete the deletion.
You can also delete directories and entire directory trees and all of their contents recursively. Midnight Commander will also ask you to verify that you wish to do that.
Use the F5 key to copy highlighted files from one panel to the other, and the F6 key to move the highlighted file to the directory in the other panel.
Viewing and editing files
Midnight Commander allows viewing of text files. Highlight the desired file and press the F3 key. The up and down arrow keys allow scrolling of long files. The F3 key, or pressing Esc key twice will return Midnight Commander to the directory panel. You can edit files by pressing F4 key instead of F3 key. I prefer vim for editing but the Midnight Commander editor is fine for making a few minor changes.
Menus
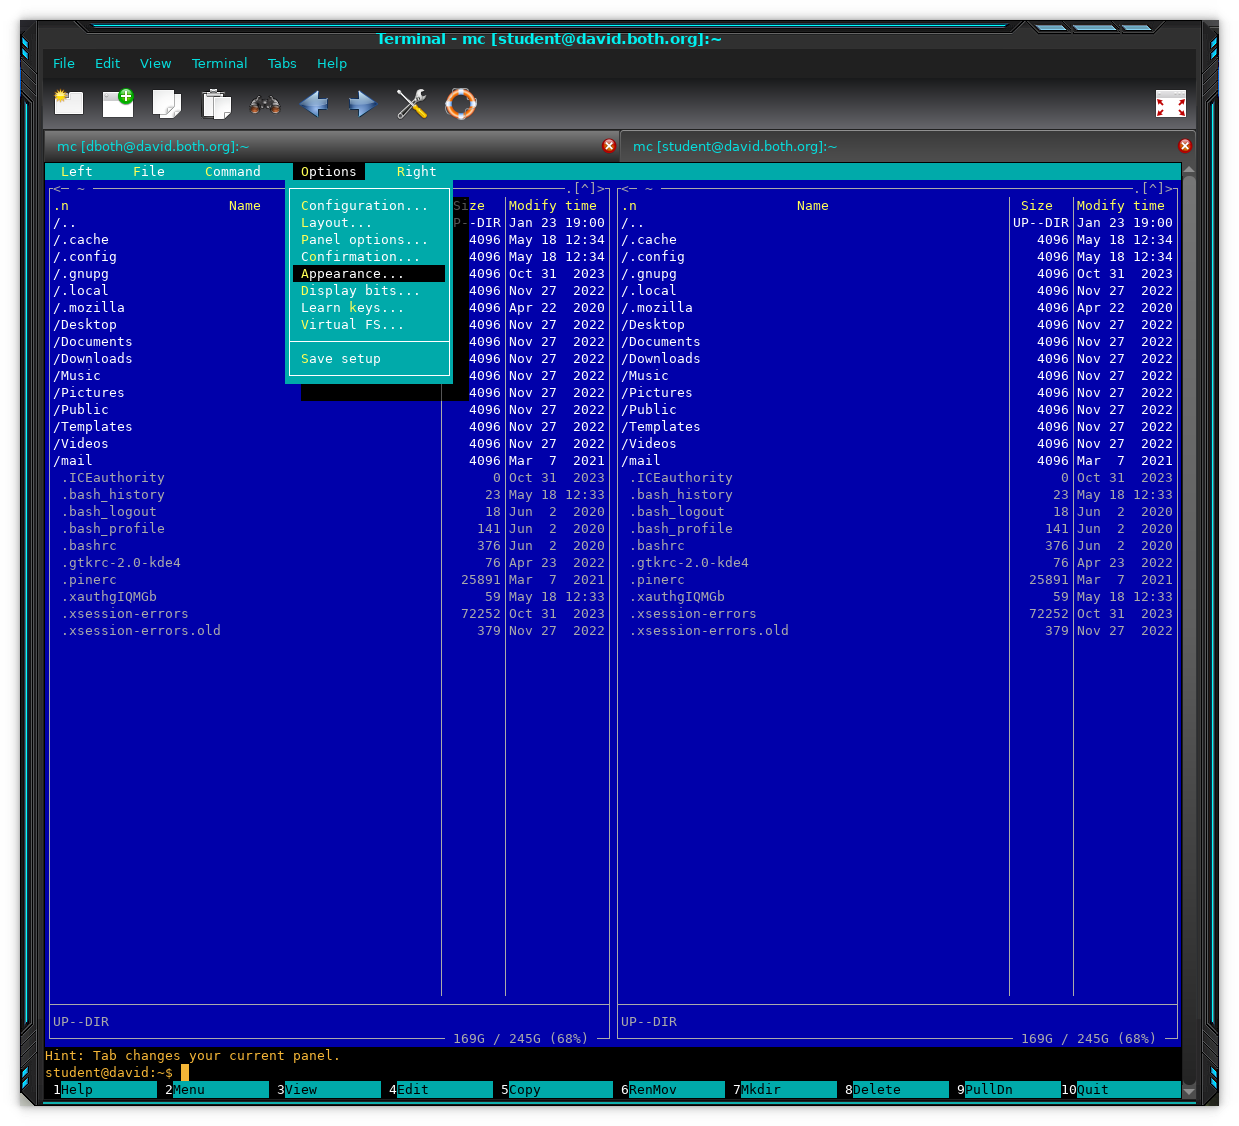
Figure 1 shows the default configuration for Midnight Commander, including the default color scheme which I find difficult to read, boring, and less than aesthetically pleasing. So the first thing to do is to change that. In order to do so we need to access the Midnight Commander menu system. Let’s start our exploration of the Midnight Commander menus by changing the color scheme. This is referred to in Midnight Commander as the “skin.” Changing the skin refers to changing the color scheme.
Start by pressing F9 which will highlight the Left menu option. This is the selector and we’ll explore it more later. For now, use the Right Arrow key to move the selector to highlight the Options menu. Then press the Down Arrow to open that menu; continue pressing the Down Arrow until the Appearance menu item is selected. Figure 3 shows what that looks like.
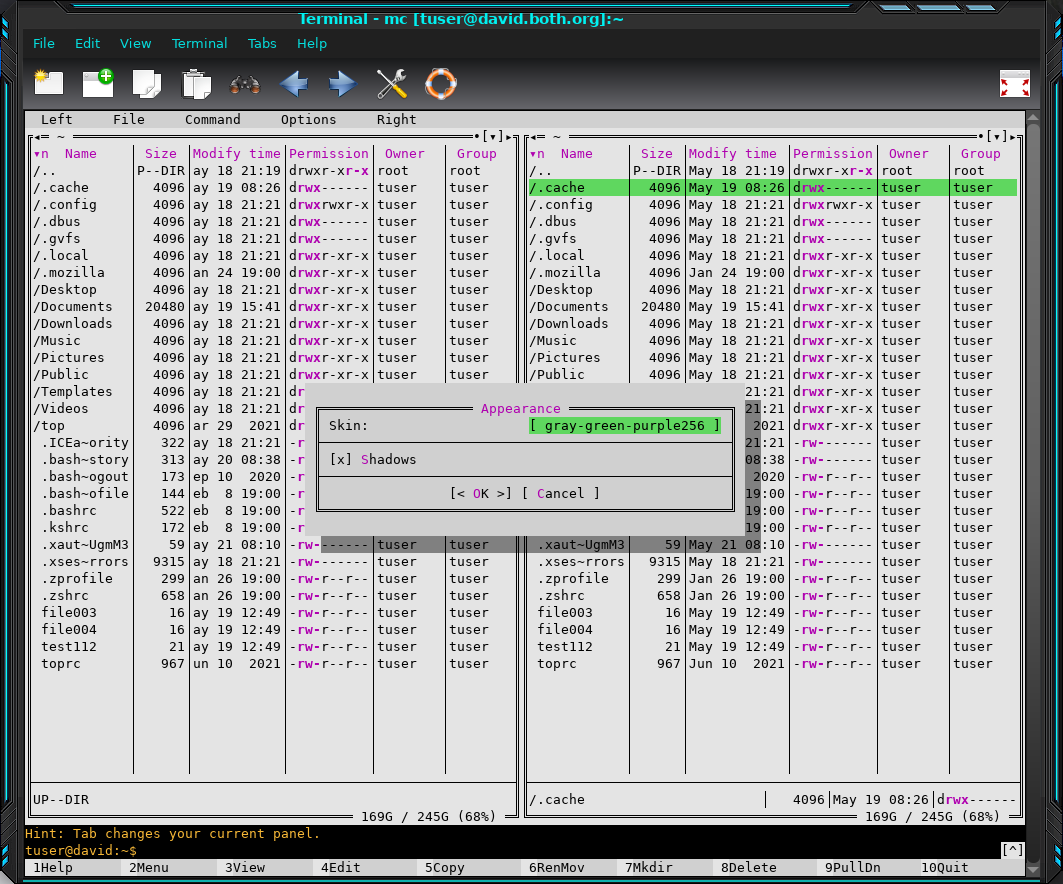
Press the Enter key to open the Appearance menu. This is a simple menu that shows the current visual scheme (the “skin”) selection. Don’t move the Selector and press Enter again to open the list of schemes. Use the arrow key to select gray-green-purple-256 as in Figure 4.

Press the Enter key to show a preview of what the gray-green-purple-256 skin will look like as in Figure 5. Don’t press Enter again just yet.
At this point we’ve not permanently selected the new skin; this is just a preview. If you press Enter again, you’ll be returned to the list of skins to choose another. This time, choose the Julia256 skin. This is nice because I sometimes play around looking for just the right skin for the color and contrast, or simply my mood. I tend towards dark skins. I’ve also found that many of the skins don’t display well from an ergonomic and accessibility standpoint and are not usable. I suggest that, if you don’t like the Julia256 skin, you try some of the others until you find one that suits you. It may be the default but that’s okay, too.
Like most Linux tools, Midnight Commander is highly configurable and it’s possible to modify existing skins or create entirely new ones. That is beyond the scope of this article but I have done it myself.
When you have selected the skin that works best for you, you can either press the O key (Uppercase letter “Oh”) or use the arrow keys to select the Ok button and then press Enter. Either way you’ve changed the Midnight Commander skin.
Configuration
Midnight Commander has many options you can modify to better meet the way you like to work. Press F9 to access the Midnight Commander Menu Bar, highlight the Options menu item, and press Enter. I don’t change most of the options on this menu, but I do change Pause after run to Always. That allows me to see the results of commands I’ve run.
You’ve probably noticed in the various figures such as Figures 3 and 4, that the data displayed can be different. For example, some figures show Permissions, Owner, and Group, while others don’t show those columns. I’ve made some changes to the Midnight Commander configuration to show these other columns.
The data columns displayed are set individually for each of the 2 panels. Press F9 to access the Midnight Commander Menu Bar and highlight the name for the desired panel, Left or Right. Choose Listing Format. The default is called the full file list but doesn’t give some of the details I like to see. To define the columns you prefer to see select the user defined option then change the text in the text entry field to look like that in Figure 6. Then press the OK button to make the change.
half type name | size | mtime | perm | owner | groupFigure 6: Use these names to define the columns you want to see in your Midnight Commander.
If you want both panels to have the same columns you’ll need to make these changes to the other as well.
Managing Files
Midnight Commander makes working with files easy. Highlight the desired file or files with the selector and use the function keys to perform most of the actions that Midnight Commander is capable of doing. For example, you can select a file and press the F5 key to copy it to the directory in the other panel. In Figure 7, I’ve selected file003 and pressed the Enter key, which opens the copy dialog.
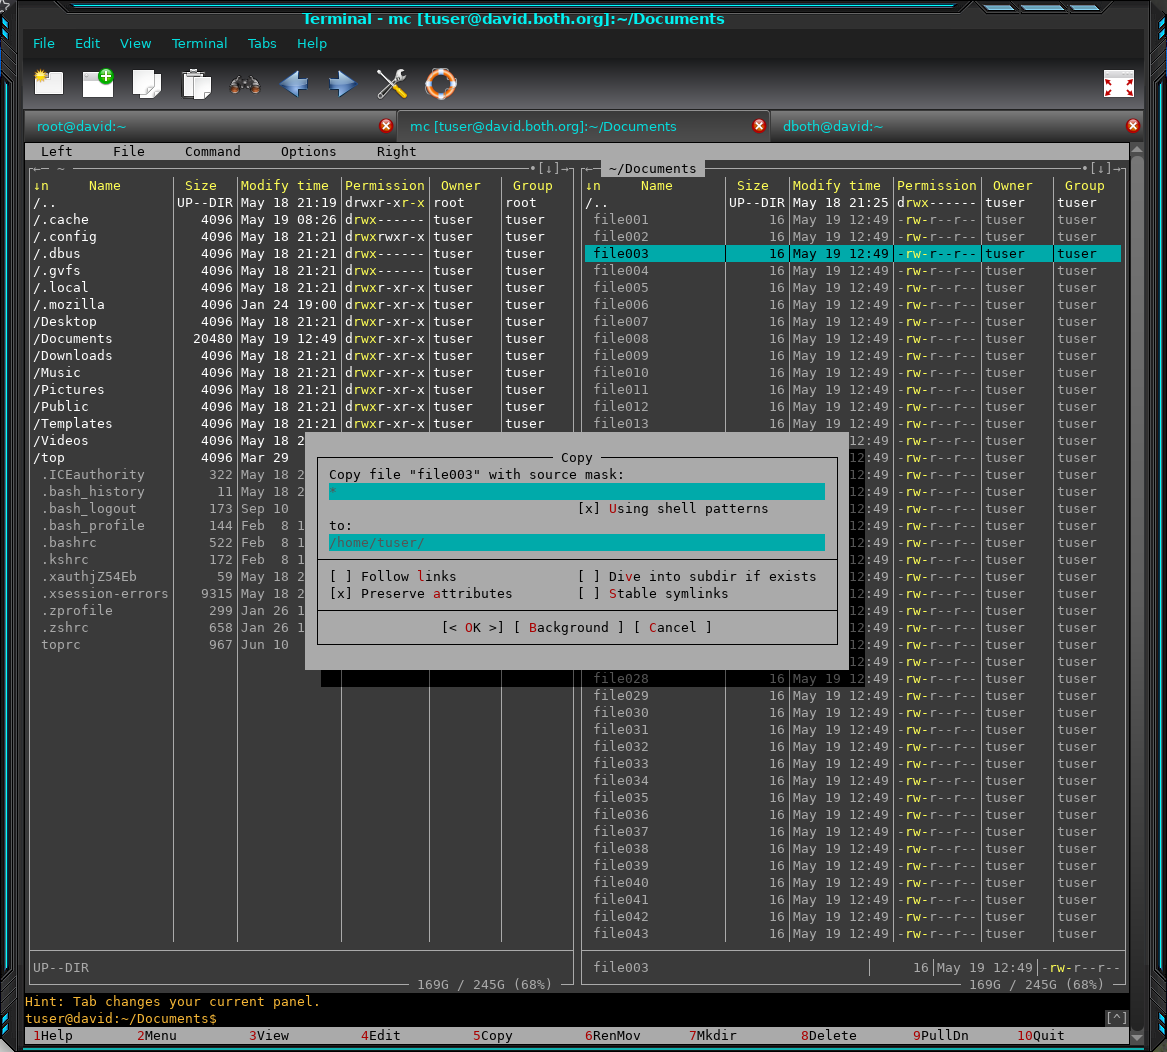
The Copy dialog allows you to verify the conditions of the copy you’re about to perform. Most of the time the defaults are perfect for me so I just press the Enter key again to complete the copy. Leaving the “X” in the Preserve attributes field keeps the file’s ownership and permissions the same in the copy-to location.
Multiple selections can be made by “tagging” the desired files thus creating a group. To tag individual files, highlight them and press the Insert key, move to the next file you want to tag and do the same until you’ve tagged all the files you want to move, delete, or copy. You can also use file globbing and regular expressions to tag files. No matter the location of the selection bar start by pressing the + key to signal Midnight Commander that you want to select multiple files. Enter the
Just below each directory panel is an area that displays a small bit of information about the selected file. That includes the name, size, and permissions. This data is not displayed by default. To enable the display of file information, select either the Right or Left menu item, then choose Listing mode, select the User mini status line and press the Enter key to place an X there. Then select OK and press the Enter key.
Between the hint line and the function keys is a command line where you can type in any Linux command.
Just above the hint line is a bit of information about the total space and the amount of free space in the current file system. This information is not about the current directory, it is for the filesystem as a whole.
Archives
One of my favorite features of Midnight Commander–and of my other favorite file managers–is the ability to drill down into the contents of various types of archive files like zip, rpm, tar, tgz, cpio and others. Simply highlight the desired archive file and press the Enter key. Midnight Commander shows the complete contents of the archive. You can navigate through the directory hierarchy inside the archive and open text files and scripts to view their content.
Midnight Commander makes it possible to directly copy individual files from the archive out to replace damaged or missing ones. I have used this capability many times to recover a damaged file from a backup tarball or to copy a good copy of a damaged executable or configuration file out of an rpm.
Running scripts
Running scripts of various types, like Bash scripts is very simple. Just highlight the executable file and press the Enter key. This works for any executable file including Bash, Perl, Python, other shell scripts, and binary executables.
Midnight Commander executes the script and displays the result. Press the Enter key to return to Midnight Commander.
Commands
Between the hint line and the function key line is a command line. To enter a command just start typing. When you press the Enter key the command will be executed and the results displayed. To return to Midnight Commander, press the Enter key.
Midnight Commander does not provide the more advanced command line editing that Bash does, but it does provide a History menu with a short listing of recent commands. Use the arrow keys to select the desired command and press the Enter key to execute it.
Help
Midnight Commander has an excellent help function. Just press the F1 key to open the help panel. Navigate to the highlighted Contents and press the Enter key to access the body of the Help function. Navigation through the Help is by keyboard or mouse.
Additional documentation is available on the Midnight Commander web site. It contains some good information but it is not nearly as complete as the Help feature. In fact, I was very surprised by the quality of the Midnight Commander Help feature. In my experience, Help features are quite terse and provide little or no big picture guidance. Some tend to be marginally helpful at best. The Midnight Commander Help feature is really more like a complete set of documentation than what I have come to think of as typical help.
There is also a very nice Midnight Commander Tutorial which was written by Jane Trembath.
There are a couple things to watch out for in Midnight Commander, just as there are from the CLI. Be certain you are in the correct pane and have highlighted the correct file before pressing F8 to delete a file or entering a command that might alter, delete or move a file to an obscure location.
Final Thoughts
Midnight Commander is a very powerful, easy to use text mode file manager. It rivals most of the GUI file managers in features and ease of use. It’s far more powerful and has many more features than I’ve covered here. It also has a good Help facility and the man page covers its functions in detail.
I find myself using it many times instead of one of the GUI file managers. I recommend that you try it for yourself and see how it works for you.