Write directly to the screen with DOS conio
One of the reasons so many DOS applications sported a text user interface (or “TUI”) is because it was so easy to do. The standard way to control console input and output (conio) was with the conio library for many C programmers. This is a de facto standard library on DOS, which gained popularity in Borland’s proprietary C compiler in the 1980s. You can also find a similar conio implementation in other compilers, including the IA-16 DOS port of the GNU C compiler (as libi86) and the Open Watcom C compiler.
Because the OpenWatcom C compiler is an easy first C compiler for many developers who want to get started with programming on FreeDOS, let’s explore the OpenWatcom conio functions.
Setting the mode
With conio, everything is immediately displayed on-screen through the video hardware. On DOS, everything is running on hardware. And that means DOS conio programs can easily access video modes and leverage screen regions in ways that are difficult using Linux ncurses, which uses terminal emulation.
To start, you need to set the video mode. On OpenWatcom, you do this with the _setvideomode function. This function takes one of several possible values as a mode value, but for most programs that run in color mode in a standard 80×25 screen, use _TEXTC80 as the mode.
#include <conio.h>
#include <graph.h>

int
main()
{
  _setvideomode(_TEXTC80);
When you’re done with your program and ready to exit back to DOS, you should reset the video mode back to whatever values it had before. For that, you can use _DEFAULTMODE as the mode.
 _setvideomode(_DEFAULTMODE);
  return 0;
}
Setting the colors
Every PC supports 16 text colors and 8 background colors. Background colors are addressed with color indices 0 through 7, and text colors can be any value from 0 to 15:
| RGB | Color | iRGB | Color |
|---|---|---|---|
| 000 | 0 Black | 1000 | 8 Bright Black |
| 001 | 1 Blue | 1001 | 9 Bright Blue |
| 010 | 2 Green | 1010 | 10 Bright Green |
| 011 | 3 Cyan | 1011 | 11 Bright Cyan |
| 100 | 4 Red | 1100 | 12 Bright Red |
| 101 | 5 Magenta | 1101 | 13 Bright Magenta |
| 110 | 6 Brown | 1110 | 14 Yellow |
| 111 | 7 White | 1111 | 15 Bright White |
You can set both the text color and the color behind it. Use the _settextcolor function to set the text color and _setbkcolor to set the background color. For example, to set the colors to yellow text on a red background, you would use this pair of functions:
 _settextcolor(14);
 _setbkcolor(4);
Printing the text
In conio, screen coordinates are always row & column pairs and start with 1,1 in the upper-left corner. For a standard 80-column display with 25 lines, the bottom-right corner is 25,80.
Use the _settextposition function to move the cursor to a specific screen coordinate, then use _outtext to print the text you want to display. For example, to print the text “FreeDOS” at line 12 and column 36 (which is more or less centered on the screen) use these two functions:
  _settextposition(12, 36);
  _outtext("FreeDOS");
Here’s a small example program:
#include <conio.h>
#include <graph.h>

int
main()
{
    _setvideomode(_TEXTC80);

    _settextcolor(14);
    _setbkcolor(4);

    _settextposition(12, 36);
    _outtext("FreeDOS");

    getch();

    _setvideomode(_DEFAULTMODE);

    return 0;
}
Compile and run the program to see this output:

Using text windows
The trick to unleashing the power of conio is to leverage text windows. A text window is just an area of the screen, defined as a rectangle starting at a particular row,col and ending at a different row,col. These regions can take up the whole screen or be as small as a single line. Once you define a window, you can clear it with a background color and position text in it.
To define a text window starting at row 5 and column 10, and extending to row 15 and column 70, you use the _settextwindow function like this:
_settextwindow(5, 10, 15, 70);Now that you’ve defined the window, any text you draw in it uses 1,1 as the upper-left corner of the text window. Placing text at 1,1 will actually position that text at row 5 and column 10, where the window starts on the screen.
You can also clear the window with a background color. The _clearscreen function does double duty to clear either the full screen or just the window that’s currently defined. To clear the entire screen, give the value _GCLEARSCREEN to the function. To clear just the window, use _GWINDOW. With either usage, you’ll fill that region with the current background color. For example, to clear the whole screen with cyan (color 3) and a smaller text window with blue (color 1) you could use this code:
  _setbkcolor(3);
  _clearscreen(_GCLEARSCREEN);

  _settextwindow(5, 10, 15, 70);
  _setbkcolor(1);
  _clearscreen(_GWINDOW);
This makes it really easy to fill in certain areas of the screen. In fact, defining a window and filling it with color is such a common thing to do that I often create a function to do both at once. Many of my conio programs include some variation of these two functions to clear the screen or window:
#include <conio.h>
#include <graph.h>

void
clear_color(int fg, int bg)
{
  _settextcolor(fg);
  _setbkcolor(bg);
  _clearscreen(_GCLEARSCREEN);
}

void
textwindow_color(int top, int left, int bottom, int right, int fg, int bg)
{
  _settextwindow(top, left, bottom, right);
  _settextcolor(fg);
  _setbkcolor(bg);
  _clearscreen(_GWINDOW);
}
A text window can be any size, even a single line. This is handy to define a title bar at the top of the screen or a status line at the bottom of the screen. Again, I find this to be such a useful addition to my programs that I’ll frequently write functions to do it for me:
#include <conio.h>
#include <graph.h>

#include <string.h>                    /* for strlen */

void
clear_color(int fg, int bg)
{
  /* see sample code, above */
}

void
textwindow_color(int top, int left, int bottom, int right, int fg, int bg)
{
  /* see sample code, above */
}

void
print_header(int fg, int bg, const char *text)
{
  textwindow_color(1, 1, 1, 80, fg, bg);

  _settextposition(1, 40 - (strlen(text) / 2));
  _outtext(text);
}

void
print_status(int fg, int bg, const char *text)
{
  textwindow_color(25, 1, 25, 80, fg, bg);

  _settextposition(1, 1);
  _outtext(text);
}
Putting it all together
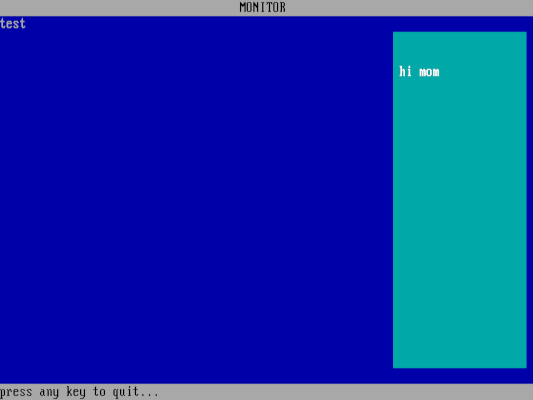
With this introduction to conio, and with the set of functions we’ve defined above, you can create the outlines of almost any program. Let’s write a quick example that demonstrates how text windows work with conio. We’ll clear the screen with a color, then print some sample text on the second line. That leaves room to put a title line at the top of the screen. We’ll also print a status line at the bottom of the screen.
This is the basics of many kinds of applications. Placing a text window towards the right of the screen could be useful if you were writing a control system, like this:
#include <conio.h>
#include <graph.h>

int
main()
{
  _setvideomode(_TEXTC80);

  clear_color(7, 1);                   /* white on blue */
  _settextposition(2, 1);
  _outtext("test");

  print_header(0, 7, "MONITOR");       /* black on white */

  textwindow_color(3, 60, 23, 79, 15, 3);       /* br white on cyan */
  _settextposition(3, 2);
  _outtext("hi mom");

  print_status(0, 7, "press any key to quit...");       /* black on white */
  getch();

  _setvideomode(_DEFAULTMODE);

  return 0;
}
Having already written our own window functions to do most of the repetitive work, this program becomes very straightforward: clear the screen with a blue background, then print “test” on the second line. There’s a header line and a status line, but the interesting part is in the middle where the program defines a text window near the right edge of the screen and prints some sample text. The getch() function waits for the user to press a key on the keyboard, useful when you need to wait until the user is ready:
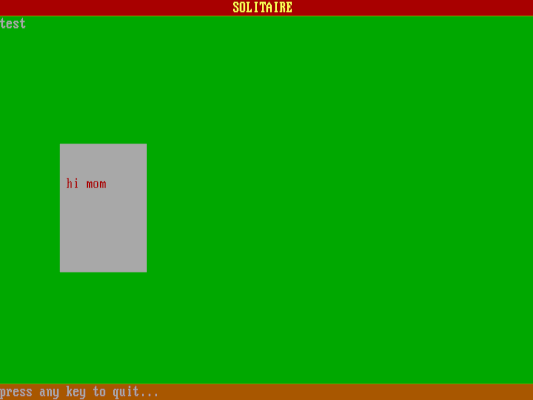
We can change only a few values to completely change the look and function of this program. By setting the background to green and red text on a white window, we have the start of a solitaire card game:
#include <conio.h>
#include <graph.h>

int
main()
{
  _setvideomode(_TEXTC80);

  clear_color(7, 2);                   /* white on green */
  _settextposition(2, 1);
  _outtext("test");

  print_header(14, 4, "SOLITAIRE");    /* br yellow on red */

  textwindow_color(10, 10, 17, 22, 4, 7);       /* red on white */
  _settextposition(3, 2);
  _outtext("hi mom");

  print_status(7, 6, "press any key to quit...");       /* white on brown */
  getch();

  _setvideomode(_DEFAULTMODE);

  return 0;
}
You could add other code to this sample program to print card values and suits, place cards on top of other cards, and other functionality to create a complete game. But for this demo, we’ll just draw a single card with sample text:
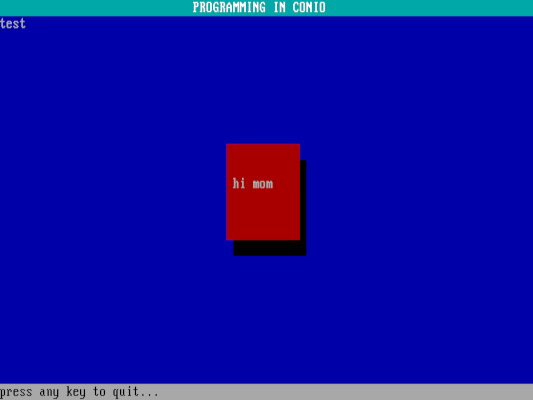
You can create other effects using text windows. For example, before drawing a message window, you could first draw a black window that’s offset by one row and one column. The text window will appear to create a shadow over that area of the screen to the user. And we can do it all by changing only a few values in our sample program:
#include <conio.h>
#include <graph.h>

int
main()
{
  _setvideomode(_TEXTC80);

  clear_color(7, 1);                   /* white on blue */
  _settextposition(2, 1);
  _outtext("test");

  print_header(15, 3, "PROGRAMMING IN CONIO");  /* br white on cyan */

  textwindow_color(11, 36, 16, 46, 7, 0);       /* shadow */
  textwindow_color(10, 35, 15, 45, 7, 4);       /* white on red */
  _settextposition(3, 2);
  _outtext("hi mom");

  print_status(0, 7, "press any key to quit...");       /* black on white */
  getch();

  _setvideomode(_DEFAULTMODE);

  return 0;
}
You often see this shadow effect used in DOS programs as a way to add some visual interest:

Using conio
The DOS conio functions can do much more than I’ve shown here, but with this introduction to conio programming, you can create various practical and exciting applications. Direct screen access means your programs can be more interactive than a simple command-line utility that scrolls text from the bottom of the screen. Leverage the flexibility of conio programming and make your next DOS program a great one.
This article is adapted from Get started programming with DOS conio by Jim Hall, and is republished with the author’s permission.