A Linux user’s guide to Logical Volume Management

Image by: WIlliam Warby. Modified by Jason Baker. Creative Commons BY-SA 2.0.
Author’s note: This article first appeared on Opensource.com in 2016. It is reposted here with some changes by the original author.
Managing storage1 space has always been a significant task for sysadmins. Running out of disk space used to be the start of a long and complex series of tasks to increase the space available to a disk partition. It also required taking the system off-line. This usually involved installing a new storage drive, booting to recovery or single-user mode, creating a partition and a filesystem on the new storage drive, using temporary mount points to move the data from the too-small filesystem to the new, larger one, changing the content of the /etc/fstab file to reflect the correct device name for the new partition, and rebooting to remount the new filesystem on the correct mount point.
When the Linux Logical Volume Manager (LVM) first made its appearance in Fedora, I resisted it rather strongly. My initial reaction was that I did not need this additional layer of abstraction between me and the hard drives. It turns out that I was wrong, and that logical volume management is very useful. Almost two decades later I depend upon its reliability and flexibility to help me keep my storage systems, both hard drives and solid state drives, up and running 24x7x365.
LVM allows for very flexible storage space management. It provides features like the ability to add space to a logical volume and its filesystem while that filesystem is mounted and active and it allows for the collection of multiple physical storage drives and partitions into a single volume group which can then be subdivided into logical volumes.
The volume manager also allows reducing the amount of disk space allocated to a logical volume, but there are a couple requirements. First, the volume must be unmounted. Second, the filesystem itself must be reduced in size before the volume on which it resides can be reduced.
It is important to note that the filesystem itself must allow resizing for this feature to work. The EXT2, 3, and 4 filesystems all allow both offline (unmounted) and online (mounted) resizing when increasing the size of a filesystem, and offline resizing when reducing the size. You should check the details of the filesystems you intend to use in order to verify whether they can be resized at all and especially whether they can be resized while online.
Expanding a filesystem on the fly
I always like to run new distributions in a VirtualBox virtual machine for a few days or weeks to ensure that I will not run into any devastating problems when I start installing it on my production machines. One morning several years ago I started installing a newly released version of Fedora in a virtual machine on my primary workstation. I thought that I had enough disk space allocated to the host filesystem in which the VM was being installed. I did not. About a third of the way through the installation I ran out of space on that filesystem. Fortunately, VirtualBox detected the out-of-space condition and paused the virtual machine, and even displayed an error message indicating the exact cause of the problem.
This problem was not due to the fact that the virtual disk was too small, it was rather the logical volume on the host computer that was running out of space so that the virtual disk belonging to the virtual machine did not have enough space to expand on the host’s logical volume.
Since most modern distributions use Logical Volume Management by default, and I had some free space available on the volume group, I was able to assign additional disk space to the appropriate logical volume and then expand filesystem of the host on the fly. This means that I did not have to reformat the entire storage drive and reinstall the operating system or even reboot. I simply assigned some of the available space to the appropriate logical volume and resized the filesystem all while the filesystem was on-line and the running program, the virtual machine, was still using the host filesystem. After resizing the logical volume and the filesystem I resumed running the virtual machine and the installation continued as if no problems had occurred.
Although this type of problem may never happen to you, running out of disk space while a critical program is running has happened to many people. And while many programs, especially Windows programs, are not as well written and resilient as VirtualBox, Linux Logical Volume Management made it possible to recover without losing any data and without having to restart the time-consuming installation.
Resizing Limitations
There are some limits on filesystem resizing. Not only must the logical volume (LV) be resizable, so must the filesystem created on the volume. Many filesystem types, such as EXT2, EXT3, and EXT4 support being resized. However, they don’t support being shrunk in all circumstances. Some filesystems like EXT1, BtrFS don’t support resizing at all.
Restrictions on reducing the size of a filesystem and its logical volume prevent most mounted filesystems from being reduced while they are mounted. This includes / (root) and other system-critical filesystems.
Before resizing any logical volume or volume group, you must verify that the filesystems contained on them are themselves resizable. The EXT filesystems are resizable in most situations.
WARNING: Only the EXT3 and EXT4 filesystems can be resized on the fly on a running, mounted filesystem. Many other filesystems including BtrFS and ZFS cannot be resized. Also, some mounted filesystems cannot be reduced in size while the system is running, such as / (root).
For this article I use an EXT4 filesystem on standard LVM volumes.
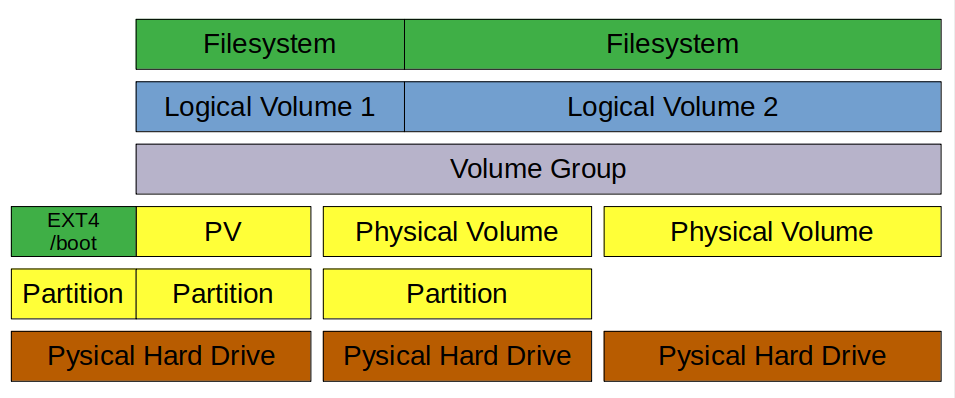
LVM Structure
The structure of a Logical Volume Manager disk environment is illustrated by Figure 1, below. Logical Volume Management enables the combining of multiple individual hard drives and/or disk partitions into a single volume group (VG). That volume group can then be subdivided into logical volumes (LV) or used as a single large volume. Regular file systems, such as EXT3 or EXT4 can then be created on a logical volume.
In Figure 1, two complete physical storage drives of different sizes and one partition from a third drive have been combined into a single volume group. Two logical volumes have been created from the space in the volume group, and a filesystem, such as an EXT4 filesystem has been created on each of the two logical volumes.
Adding disk space to a host is fairly straightforward but, in my experience, is done relatively infrequently. With modern, multi-terabyte storage drives, it is seldom necessary for most SysAdmins to combine multiple drives into a single volume. Such combinations are usually only necessary on older systems with multiple smaller storage drives.
The basic steps needed are listed below. You can either create an entirely new volume group or you can add the new space to an existing volume group and either expand an existing logical volume or create a new one.
Adding a new logical volume
There are times when it is necessary to add a new logical volume to a host. For example, after noticing that the directory containing virtual disks for my VirtualBox virtual machines was filling up the /home filesystem, I decided to create a new logical volume in which to store the virtual machine data, including the virtual disks. This would free up a great deal of space in my /home filesystem and also allow me to manage the disk space for the VMs independently.
The basic steps for adding a new logical volume are as follows.
- If necessary, install a new storage drive.
- Optional: Create a partition on the storage drive.
- Create a physical volume (PV) of the complete storage drive or a partition on the storage drive.
- Assign the new physical volume to an existing volume group (VG) or create a new volume group.
- Create a new logical volumes (LV) from the space in the volume group.
- Create a filesystem on the new logical volume.
- Add appropriate entries to /etc/fstab for mounting the filesystem.
- Mount the filesystem.
Now for the details. The following sequence is taken from an example I used as a lab project when teaching about Linux filesystems.
Example
This example shows how to use the CLI to extend an existing volume group to add more space to it, create a new logical volume in that space, and create a filesystem on the logical volume. This procedure can be performed on a running, mounted filesystem.
Install storage drive
If there is not enough space in the volume group on the existing storage drive(s) in the system to add the desired amount of space it may be necessary to add a new storage drive and create the space to add to the Logical Volume. First, install the physical storage drive, and then perform the following steps.
Create Physical Volume from storage drive
It is first necessary to create a new Physical Volume (PV). Use the command below, which assumes that the new storage drive is assigned as /dev/sdd.
# pvcreate /dev/sddIt is not necessary to create a partition of any kind on the new storage drive. This creation of the Physical Volume which will be recognized by the Logical Volume Manager can be performed on a newly installed raw disk or on a Linux partition of type 83. If you are going to use the entire storage drive, creating a partition first does not offer any particular advantages and uses disk space for metadata that could otherwise be used as part of the PV.
Extend the existing Volume Group
In this example we will extend an existing volume group rather than creating a new one; you can choose to do it either way. After the Physical Volume has been created, extend the existing Volume Group (VG) to include the space on the new PV. In this example the existing Volume Group is named MyVG01.
# vgextend /dev/MyVG01 /dev/sddCreate the Logical Volume
First create the Logical Volume (LV) from existing free space within the Volume Group. The command below creates a LV with a size of 50GB. The Volume Group name is MyVG01 and the Logical Volume Name is Stuff.
# lvcreate -L +50G --name Stuff MyVG01Create the filesystem
Creating the Logical Volume does not create the filesystem. That task must be performed separately. The command below creates an EXT4 filesystem that fits the newly created Logical Volume.
# mkfs -t ext4 /dev/MyVG01/StuffAdd a filesystem label
Adding a filesystem label makes it easy to identify the filesystem later in case of a crash or other disk related problems.
# e2label /dev/MyVG01/Stuff StuffMount the filesystem
At this point you can create a mount point, add an appropriate entry to the /etc/fstab file, and mount the filesystem. You should also check to verify the volume has been created correctly. You can use the df, lvs, and vgs commands to do this.
Resizing a logical volume in an LVM filesystem
The need to resize a filesystem has been around since the beginning of the first versions of Unix and has not gone away with Linux. It has gotten easier, however, with Logical Volume Management.
- If necessary, install a new storage drive.
- Optional: Create a partition on the storage drive.
- Create a physical volume (PV) of the complete storage drive or a partition on the storage drive.
- Assign the new physical volume to an existing volume group (VG) or create a new volume group.
- Create one or more logical volumes (LV) from the space in the volume group, or expand an existing logical volume with some or all of the new space in the volume group.
- If you created a new logical volume, create a filesystem on it. If adding space to an existing logical volume, use the resize2fs command to enlarge the filesystem to fill the space in the logical volume.
- Add appropriate entries to /etc/fstab for mounting the filesystem.
- Mount the filesystem.
Example
This example describes how to resize an existing Logical Volume in an LVM environment using the CLI. It adds about 50GB of space to the /Stuff filesystem. This procedure can be used on a mounted, live filesystem only with the Linux 2.6 Kernel (and higher) and EXT3 and EXT4 filesystems. I do not recommend that you do so on any critical system, but it can be done and I have done so many times; even on the root (/) filesystem. Use your judgment.
Install the storage drive
If there is not enough space on the existing storage drive(s) in the system to add the desired amount of space it may be necessary to add a new storage drive and create the space to add to the Logical Volume. First, install the physical storage drive and then perform the following steps.
Create a Physical Volume from the storage drive
It is first necessary to create a new Physical Volume (PV). Use the command below, which assumes that the new storage drive is assigned as /dev/sdd.
# pvcreate /dev/sddIt is not necessary to create a partition of any kind on the new storage drive. This creation of the Physical Volume which will be recognized by the Logical Volume Manager can be performed on a newly installed raw disk or on a Linux partition of type 83. If you are going to use the entire storage drive, creating a partition first does not offer any particular advantages and uses disk space for metadata that could otherwise be used as part of the PV.
Add PV to existing Volume Group
For this example, we will use the new PV to extend an existing Volume Group. After the Physical Volume has been created, extend the existing Volume Group (VG) to include the space on the new PV. In this example, the existing Volume Group is named MyVG01.
# vgextend /dev/MyVG01 /dev/sddExtend the Logical Volume
Extend the Logical Volume (LV) from existing free space within the Volume Group. The command below expands the LV by 50GB. The Volume Group name is MyVG01 and the Logical Volume Name is Stuff.
# lvextend -L +50G /dev/MyVG01/StuffExpand the filesystem
Extending the Logical Volume will also expand the filesystem if you use the -r option. If you do not use the -r option, that task must be performed separately. The command below resizes the filesystem to fit the newly resized Logical Volume.
# resize2fs /dev/MyVG01/StuffYou should check to verify the resizing has been performed correctly. You can use the df, lvs, and vgs commands to do this.
Tips
Over the years I have learned a few things that can make logical volume management even easier than it already is. Hopefully these tips can prove of some value to you.
- Use the Extended file systems unless you have a clear reason to use another filesystem. Not all filesystems support resizing but EXT2, 3, and 4 do. The EXT filesystems are also very fast and efficient. In any event, they can be tuned by a knowledgeable sysadmin to meet the needs of most environments if the defaults tuning parameters do not.
- Use meaningful volume and volume group names.
- Use EXT filesystem labels.
- Always verify that a filesystem, in both senses of the word2, is capable of being resized.
- The term “storage” is used in this document to refer interchangeably to either hard disk drives (HDD) or Solid State Drives (SSD). ↩
- The first of these two meanings of “filesystem” is in the sense of a filesystem type such as EXT4, ZFS, XFS, and others. The second meaning is that of a mountable file directory structure such as / (the root filesystem), /var, /home, and so on. ↩